Tuesday, November 18, 2014

JMS - Install RabbitMQ on Windows

RabbitMQ is an open source message broker software that implements the Advanced Message Queuing Protocol (AMQP). The RabbitMQ server is written in the Erlang programming language and client libraries to interface with the broker are available for all major programming languages. Following tutorial shows how to install RabbitMQ and perform a start/stop of the installed instance on Windows.

Install Erlang

Erlang is a general-purpose concurrent, garbage-collected programming language and runtime system. It was designed by Ericsson to support distributed, fault-tolerant applications. It was originally a proprietary language within Ericsson, but was released as open source in 1998. OTP (Open Telecom Platform) is the open source distribution of Erlang.

First thing to do is to download the OTP binaries. Go the the Erlang download page and click on the Windows binary link for your system (32-bit or 64-bit). At the time of writing the latest stable release was 'otp_win64_17.3.exe'. Note that there are also pre-built packages for platforms such as: Raspbian, Ubuntu, Fedora, OS X, and more.

Double click to run the downloaded '.exe' file and click Next keeping the default settings on the first installer step.

erlang installer welcome

Optionally change the default destination folder and click Next and then Install. In the example below the install location was change to 'D:\source4code\tools\erl6.2'. From now on we will refer to this directory as: [erlang_install_dir].

erlang installer installation path

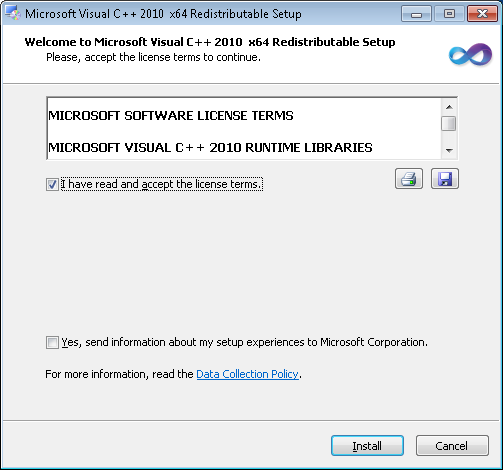
If Microsoft Visual C++ is not already setup on your system, a second installer window will pop-up. Click the 'I have read and accept the license terms' check-box and click Install.

microsoft visual c++ installer

Click Finish when the Microsoft Visual C++ setup is complete and then click Close to finish the OTP installation.

microsoft visual c++ installer completed

In order for Erlang applications to be able to run we need to setup an 'ERLANG_HOME' environment variable that will point to the Erlang installation directory. When using Windows the above parameters can be configured on the Environment Variables panel. Click on the Windows Start button and enter "env" without quotes as shown below.

edit environment variables for your account

Environment variables can be set at account level or at system level. For this example click on Edit environment variables for your account and following panel should appear.

environment variables panel

Click on the New button and enter "ERLANG_HOME" as variable name and the [erlang_install_dir] as variable value. In this tutorial the installation directory is "D:\source4code\tools\erl6.2". Click OK to to save.

erlang_home user variable

Install RabbitMQ

RabbitMQ can be downloaded from the RabbitMQ download page. There are a number of different download packages available, for this tutorial we will be installing the manual install package on Windows.At the time of writing the latest stable release was 'rabbitmq-server-windows-3.4.1.zip'.

Extract the binaries archive downloaded in the previous step. The extracted root directory should contain a number of files and subdirectories as shown below. From now on we will refer to this directory as: [rabbitmq_install_dir].

In order to start RabbitMQ, open a command prompt by clicking on the Windows Start button and typing "cmd" followed by pressing ENTER. A new command prompt window should open. Navigate to the [rabbitmq_install_dir]/sbin and enter following command:
rabbitmq-server

rabbitmq start command

In order to stop RabbitMQ, open another command prompt at the [rabbitmq_install_dir]/sbin and enter following command:
rabbitmqctl stop

rabbitmq stop command

Setup RabbitMQ

The 'rabbitmq-management' plugin provides a browser-based UI for management and monitoring of the RabbitMQ server . In order to enable the UI, make sure RabbitMQ is running and open a new command prompt at [rabbitmq_install_dir]/sbin in which you enter following:
rabbitmq-plugins enable rabbitmq_management

rabbitmq enable web console

Open the RabbitMQ web console in a browser using: http://localhost:15672 and following page should be displayed:

rabbitmq web console login

Enter following default credentials: Username="guest" and Password="guest" and click on Login. The overview page will be displayed that shows some basic information on the RabbitMQ server:

rabbitmq web console


This concludes setting up and configuring RabbitMQ. If you found this post helpful or have any questions or remarks, please leave a comment.

Wednesday, November 12, 2014

EasyMock - unit testing FacesContext using PowerMock, JUnit and Maven

easymock logo
JSF defines the FacesContext abstract base class for representing all of the contextual information associated with processing an incoming request, and creating the corresponding response. When writing unit test cases for a JSF application there might be a need to mock some of FacesContext static methods. The following post will illustrate how to do this using PowerMock, which is a framework that allows you to extend mock libraries like EasyMock with extra capabilities. In this case the capability to mock the static methods of FacesContext.

Tools used:
  • JUnit 4.11
  • EasyMock 3.2
  • PowerMock 1.5
  • Maven 3

The code sample is built and run using Maven. Specified below is the Maven POM file which contains the needed dependencies for JUnit, EasyMock and PowerMock. In addition the PowerMock support module for JUnit ('powermock-module-junit4') and the PowerMock API for EasyMock ('powermock-api-easymock') dependencies need to be added as specified here.

As the FacesContext class is used in this code sample, dependencies to the EL (Expression Language) API and JSF specification API are also included.

Note that the version of JUnit is not the latest as there seems to be a bug where PowerMock doesn't recognize the correct JUnit version when using JUnit 4.12.

<?xml version="1.0" encoding="UTF-8"?>
<project xmlns="http://maven.apache.org/POM/4.0.0" xmlns:xsi="http://www.w3.org/2001/XMLSchema-instance"
xsi:schemaLocation="http://maven.apache.org/POM/4.0.0 http://maven.apache.org/xsd/maven-4.0.0.xsd">
<modelVersion>4.0.0</modelVersion>

<groupId>info.source4code</groupId>
<artifactId>easymock-powermock-facescontext</artifactId>
<version>1.0</version>
<packaging>jar</packaging>

<name>EasyMock - Mocking FacesContext using PowerMock</name>
<url>http://www.source4code.info/2014/11/easymock-mocking-facescontext-using.html</url>

<properties>
<project.build.sourceEncoding>UTF-8</project.build.sourceEncoding>
<java.version>1.6</java.version>

<junit.version>4.11</junit.version>
<easymock.version>3.2</easymock.version>
<powermock.version>1.5.6</powermock.version>

<el.version>2.2.1-b04</el.version>
<jsf.version>2.2.8-02</jsf.version>

<maven-compiler-plugin.version>3.1</maven-compiler-plugin.version>
</properties>

<dependencies>
<!-- JUnit -->
<dependency>
<groupId>junit</groupId>
<artifactId>junit</artifactId>
<version>${junit.version}</version>
<scope>test</scope>
</dependency>
<!-- EasyMock -->
<dependency>
<groupId>org.easymock</groupId>
<artifactId>easymock</artifactId>
<version>${easymock.version}</version>
<scope>test</scope>
</dependency>
<!-- PowerMock -->
<dependency>
<groupId>org.powermock</groupId>
<artifactId>powermock-module-junit4</artifactId>
<version>${powermock.version}</version>
<scope>test</scope>
</dependency>
<dependency>
<groupId>org.powermock</groupId>
<artifactId>powermock-api-easymock</artifactId>
<version>${powermock.version}</version>
<scope>test</scope>
</dependency>
<!-- EL (Unified Expression Language) -->
<dependency>
<groupId>javax.el</groupId>
<artifactId>el-api</artifactId>
<version>${el.version}</version>
<scope>test</scope>
</dependency>
<!-- JSF -->
<dependency>
<groupId>com.sun.faces</groupId>
<artifactId>jsf-api</artifactId>
<version>${jsf.version}</version>
</dependency>
</dependencies>

<build>
<plugins>
<plugin>
<groupId>org.apache.maven.plugins</groupId>
<artifactId>maven-compiler-plugin</artifactId>
<version>${maven-compiler-plugin.version}</version>
<configuration>
<source>${java.version}</source>
<target>${java.version}</target>
</configuration>
</plugin>
</plugins>
</build>
</project>

The SomeBean class below contains two methods that make use of FacesContext. The first addMessage() method will create a new FacesMessage and add it to the FacesContext. The second logout() method will invalidate the current session.

package info.source4code.mockito;

import javax.faces.application.FacesMessage;
import javax.faces.application.FacesMessage.Severity;
import javax.faces.bean.ManagedBean;
import javax.faces.context.FacesContext;

@ManagedBean
@SessionScoped
public class SomeBean {

public void addMessage(Severity severity, String summary, String detail) {
FacesContext.getCurrentInstance().addMessage(null,
new FacesMessage(severity, summary, detail));
}

public String logout() {
FacesContext.getCurrentInstance().getExternalContext()
.invalidateSession();

return "logout?faces-redirect=true";
}
}

Next is the SomeBeanTest JUnit test class. The class is annotated using two annotations. The first @RunWith annotation tells JUnit to run the test using PowerMockRunner. The second @PrepareForTest annotation tells PowerMock to prepare to mock the FacesContext class. If there are multiple classes to be prepared for mocking, they can be specified using a comma separated list.

In the setup() method a number of objects are specified that are similar for the two test cases. The mockStatic() method is called in order to tell PowerMock to mock all static methods of the given FacesContext class. In addition the FacesContext and ExternalContext mock objects are created.

Next are the two test cases which follow the basic EasyMock testing steps:
StepAction
1Call expect(mock.[method call]).andReturn([result]) for each expected call
2Call mock.[method call], then EasyMock.expectLastCall() for each expected void call
3Call replay(mock) to switch from “record” mode to “playback” mode
4Call the test method
5Call verify(mock) to assure that all expected calls happened

In addition to this, the first addMessage() test case uses the Capture capability of EasyMock in order to test whether a FacesMessage with the correct values was added to the FacesContext. The second testLogout() test case checks if the correct redirect was returned.

package info.source4code.easymock;

import static org.easymock.EasyMock.capture;
import static org.easymock.EasyMock.createMock;
import static org.easymock.EasyMock.expect;
import static org.easymock.EasyMock.expectLastCall;
import static org.easymock.EasyMock.replay;
import static org.easymock.EasyMock.verify;
import static org.junit.Assert.assertEquals;
import static org.junit.Assert.assertNull;

import javax.faces.application.FacesMessage;
import javax.faces.context.ExternalContext;
import javax.faces.context.FacesContext;

import org.easymock.Capture;
import org.junit.Before;
import org.junit.Test;
import org.junit.runner.RunWith;
import org.powermock.api.easymock.PowerMock;
import org.powermock.core.classloader.annotations.PrepareForTest;
import org.powermock.modules.junit4.PowerMockRunner;

@RunWith(PowerMockRunner.class)
@PrepareForTest({ FacesContext.class })
public class SomeBeanTest {

private SomeBean someBean;

private FacesContext facesContext;
private ExternalContext externalContext;

@Before
public void setUp() throws Exception {
someBean = new SomeBean();

// mock all static methods of FacesContext using PowerMockito
PowerMock.mockStatic(FacesContext.class);

facesContext = createMock(FacesContext.class);
externalContext = createMock(ExternalContext.class);
}

@Test
public void testAddMessage() {
// create Capture instances for the clientId and FacesMessage parameters
// that will be added to the FacesContext
Capture<String> clientIdCapture = new Capture<String>();
Capture<FacesMessage> facesMessageCapture = new Capture<FacesMessage>();

expect(FacesContext.getCurrentInstance()).andReturn(facesContext)
.once();
// expect the call to the addMessage() method and capture the arguments
facesContext.addMessage(capture(clientIdCapture),
capture(facesMessageCapture));
expectLastCall().once();

// replay the class (not the instance)
PowerMock.replay(FacesContext.class);
replay(facesContext);

someBean.addMessage(FacesMessage.SEVERITY_ERROR, "error",
"something went wrong");

// verify the class (not the instance)
PowerMock.verify(FacesContext.class);
verify(facesContext);

// check the value of the clientId that was passed
assertNull(clientIdCapture.getValue());

// retrieve the captured FacesMessage
FacesMessage captured = facesMessageCapture.getValue();
// check if the captured FacesMessage contains the expected values
assertEquals(FacesMessage.SEVERITY_ERROR, captured.getSeverity());
assertEquals("error", captured.getSummary());
assertEquals("something went wrong", captured.getDetail());
}

@Test
public void testLogout() {
expect(FacesContext.getCurrentInstance()).andReturn(facesContext)
.once();
expect(facesContext.getExternalContext()).andReturn(externalContext)
.once();
// expect the call to the invalidateSession() method
externalContext.invalidateSession();
expectLastCall().once();

// replay the class (not the instance)
PowerMock.replay(FacesContext.class);
replay(facesContext);
replay(externalContext);

assertEquals("logout?faces-redirect=true", someBean.logout());

// verify the class (not the instance)
PowerMock.verify(FacesContext.class);
verify(facesContext);
verify(externalContext);
}
}

In order to run the above test cases, open a command prompt and execute following Maven command:

mvn test


github icon
If you would like to run the above code sample you can download the full source code and their corresponding JUnit test cases here.

This concludes the mocking FacesContext using EasyMock and PowerMock example. If you found this post helpful or have any questions or remarks, please leave a comment.

Monday, November 10, 2014

Mockito - unit testing FacesContext using PowerMock, JUnit and Maven

mockito logo
JSF defines the FacesContext abstract base class for representing all of the contextual information associated with processing an incoming request, and creating the corresponding response. When writing unit test cases for a JSF application there might be a need to mock some of the FacesContext static methods. The following post will illustrate how to do this using PowerMock, a framework that allows you to extend mock libraries like Mockito with extra capabilities. In this case the capability to mock the static methods of FacesContext.

Tools used:
  • JUnit 4.11
  • Mockito 1.10
  • PowerMock 1.5
  • Maven 3

The code sample is built and run using Maven. Specified below is the Maven POM file which contains the needed dependencies for JUnit, Mockito and PowerMock. In addition the PowerMock support module for JUnit ('powermock-module-junit4') and the PowerMock API for Mockito ('powermock-api-mockito') dependencies need to be added as specified here.

As the FacesContext class is used in this code sample, dependencies to the EL (Expression Language) API and JSF specification API are also included.

Note that the version of JUnit is not the latest as there seems to be a bug where PowerMock doesn't recognize the correct JUnit version when using JUnit 4.12.
<?xml version="1.0" encoding="UTF-8"?>
<project xmlns="http://maven.apache.org/POM/4.0.0" xmlns:xsi="http://www.w3.org/2001/XMLSchema-instance"
xsi:schemaLocation="http://maven.apache.org/POM/4.0.0 http://maven.apache.org/xsd/maven-4.0.0.xsd">
<modelVersion>4.0.0</modelVersion>

<groupId>info.source4code</groupId>
<artifactId>mockito-powermock-facescontext</artifactId>
<version>1.0</version>
<packaging>jar</packaging>

<name>Mockito - Mocking FacesContext using PowerMock</name>
<url>http://www.source4code.info/2014/11/mockito-mocking-facescontext-using.html</url>

<properties>
<project.build.sourceEncoding>UTF-8</project.build.sourceEncoding>
<java.version>1.6</java.version>

<junit.version>4.11</junit.version>
<mockito.version>1.10.8</mockito.version>
<powermock.version>1.5.6</powermock.version>

<el.version>2.2.1-b04</el.version>
<jsf.version>2.2.8-02</jsf.version>

<maven-compiler-plugin.version>3.1</maven-compiler-plugin.version>
</properties>

<dependencies>
<!-- JUnit -->
<dependency>
<groupId>junit</groupId>
<artifactId>junit</artifactId>
<version>${junit.version}</version>
<scope>test</scope>
</dependency>
<!-- Mockito -->
<dependency>
<groupId>org.mockito</groupId>
<artifactId>mockito-core</artifactId>
<version>${mockito.version}</version>
<scope>test</scope>
</dependency>
<!-- PowerMock -->
<dependency>
<groupId>org.powermock</groupId>
<artifactId>powermock-module-junit4</artifactId>
<version>${powermock.version}</version>
<scope>test</scope>
</dependency>
<dependency>
<groupId>org.powermock</groupId>
<artifactId>powermock-api-mockito</artifactId>
<version>${powermock.version}</version>
<scope>test</scope>
</dependency>
<!-- EL (Unified Expression Language) -->
<dependency>
<groupId>javax.el</groupId>
<artifactId>el-api</artifactId>
<version>${el.version}</version>
<scope>test</scope>
</dependency>
<!-- JSF -->
<dependency>
<groupId>com.sun.faces</groupId>
<artifactId>jsf-api</artifactId>
<version>${jsf.version}</version>
</dependency>
</dependencies>

<build>
<plugins>
<plugin>
<groupId>org.apache.maven.plugins</groupId>
<artifactId>maven-compiler-plugin</artifactId>
<version>${maven-compiler-plugin.version}</version>
<configuration>
<source>${java.version}</source>
<target>${java.version}</target>
</configuration>
</plugin>
</plugins>
</build>
</project>

The SomeBean class below contains two methods that make use of FacesContext. The first addMessage() method will create a new FacesMessage and add it to the FacesContext. The second logout() method will invalidate the current session.
package info.source4code.mockito;

import javax.faces.application.FacesMessage;
import javax.faces.application.FacesMessage.Severity;
import javax.faces.bean.ManagedBean;
import javax.faces.context.FacesContext;

@ManagedBean
@SessionScoped
public class SomeBean {

public void addMessage(Severity severity, String summary, String detail) {
FacesContext.getCurrentInstance().addMessage(null,
new FacesMessage(severity, summary, detail));
}

public String logout() {
FacesContext.getCurrentInstance().getExternalContext()
.invalidateSession();

return "logout?faces-redirect=true";
}
}

The SomeBeanTest JUnit test class is used to test the above. The class is annotated using two annotations. The first @RunWith annotation tells JUnit to run the test using PowerMockRunner. The second @PrepareForTest annotation tells PowerMock to prepare to mock the FacesContext class. If there are multiple classes to be prepared for mocking, they can be specified using a comma separated list.

Mockito provides the @Mock annotation which is a shorthand for mocks creation. In the below test class it is used to create the FacesContext and ExternalContext mocks. Note that the previous @RunWith(PowerMockRunner.class) annotation will take care of initializing fields annotated with Mockito annotations. 

In the setup() method a number of objects are specified that are similar for the two test cases. The mockStatic() method is called in order to tell PowerMock to mock all static methods of the given FacesContext class. We then use the when() method to specify what instance to return in case the getCurrentInstance() method is called on FacesContext. The same is done for the getExternalContext() method.
Note that because of the 'org.mockito.Mockito.when' import there is no Mockito class name in front of the static when() method.
The first addMessage() test case uses the ArgumentCaptor capability of Mockito in order to test whether a FacesMessage with the correct values was added to the FacesContext. The second testLogout() test case checks if the correct redirect was returned.
package info.source4code.mockito;

import static org.junit.Assert.assertEquals;
import static org.junit.Assert.assertNull;
import static org.mockito.Mockito.verify;
import static org.mockito.Mockito.when;

import javax.faces.application.FacesMessage;
import javax.faces.context.ExternalContext;
import javax.faces.context.FacesContext;

import org.junit.Before;
import org.junit.Test;
import org.junit.runner.RunWith;
import org.mockito.ArgumentCaptor;
import org.mockito.Mock;
import org.powermock.api.mockito.PowerMockito;
import org.powermock.core.classloader.annotations.PrepareForTest;
import org.powermock.modules.junit4.PowerMockRunner;

@RunWith(PowerMockRunner.class)
@PrepareForTest({ FacesContext.class })
public class SomeBeanTest {

private SomeBean someBean;

@Mock
private FacesContext facesContext;
@Mock
private ExternalContext externalContext;

@Before
public void setUp() throws Exception {
someBean = new SomeBean();

// mock all static methods of FacesContext using PowerMockito
PowerMockito.mockStatic(FacesContext.class);

when(FacesContext.getCurrentInstance()).thenReturn(facesContext);
when(facesContext.getExternalContext()).thenReturn(externalContext);
}

@Test
public void testAddMessage() {
// create Captor instances for the clientId and FacesMessage parameters
// that will be added to the FacesContext
ArgumentCaptor<String> clientIdCaptor = ArgumentCaptor
.forClass(String.class);
ArgumentCaptor<FacesMessage> facesMessageCaptor = ArgumentCaptor
.forClass(FacesMessage.class);

// run the addMessage() method to be tested
someBean.addMessage(FacesMessage.SEVERITY_ERROR, "error",
"something went wrong");

// verify if the call to addMessage() was made and capture the arguments
verify(facesContext).addMessage(clientIdCaptor.capture(),
facesMessageCaptor.capture());

// check the value of the clientId that was passed
assertNull(clientIdCaptor.getValue());

// retrieve the captured FacesMessage
FacesMessage captured = facesMessageCaptor.getValue();
// check if the captured FacesMessage contains the expected values
assertEquals(FacesMessage.SEVERITY_ERROR, captured.getSeverity());
assertEquals("error", captured.getSummary());
assertEquals("something went wrong", captured.getDetail());
}

@Test
public void testLogout() {
assertEquals("logout?faces-redirect=true", someBean.logout());
}
}

In order to run the above test cases, open a command prompt and execute following Maven command:
mvn test


github icon
If you would like to run the above code sample you can download the full source code and their corresponding JUnit test cases here.

This concludes the mocking FacesContext using Mockito and PowerMock example. If you found this post helpful or have any questions or remarks, please leave a comment.

Sunday, October 26, 2014

JMS - Point-to-Point messaging example using ActiveMQ and Maven

jms logo
A point-to-point (PTP) product or application is built on the concept of message queues, senders and receivers. Each message is addressed to a specific queue and receiving clients extract messages from the queues established to hold their messages. Queues retain all messages sent to them until the messages are consumed. The following post introduces the basic concepts of JMS point-to-point messaging and illustrates them with a code sample using ActiveMQ and Maven.

Point-to-Point Messaging

point-to-point messaging
PTP messaging has the following characteristics:
  • Each message has only one consumer.
  • A sender and a receiver of a message have no timing dependencies. The receiver can fetch the message whether or not it was running when the client sent the message.
  • The receiver acknowledges the successful processing of a message.

ActiveMQ Example

Let's illustrate the above characteristics by creating a message producer that sends a message containing a first and last name to a queue. In turn a message consumer will read the message and transform it into a greeting. The code is very similar to the JMS Hello World example but contains a few key differences explained below.

Tools used:
  • ActiveMQ 5.10
  • Maven 3

The code is built and run using Maven. Specified below is the Maven POM file which contains the needed dependencies for Logback, JUnit and ActiveMQ.
<?xml version="1.0" encoding="UTF-8"?>
<project xmlns="http://maven.apache.org/POM/4.0.0" xmlns:xsi="http://www.w3.org/2001/XMLSchema-instance"
xsi:schemaLocation="http://maven.apache.org/POM/4.0.0 http://maven.apache.org/xsd/maven-4.0.0.xsd">
<modelVersion>4.0.0</modelVersion>

<groupId>info.source4code</groupId>
<artifactId>jms-activemq-point-to-point</artifactId>
<version>1.0</version>
<packaging>jar</packaging>

<name>JMS - Point-to-Point messaging using ActiveMQ</name>
<url>http://www.source4code.info/2014/10/jms-point-to-point-messaging-example-activemq-maven.html</url>

<properties>
<project.build.sourceEncoding>UTF-8</project.build.sourceEncoding>
<java.version>1.6</java.version>

<logback.version>1.1.2</logback.version>
<slf4j.version>1.7.7</slf4j.version>
<junit.version>4.12-beta-2</junit.version>
<activemq.version>5.10.0</activemq.version>

<maven-compiler-plugin.version>3.1</maven-compiler-plugin.version>
</properties>

<dependencies>
<!-- Logging -->
<dependency>
<groupId>ch.qos.logback</groupId>
<artifactId>logback-classic</artifactId>
<version>${logback.version}</version>
</dependency>
<dependency>
<groupId>org.slf4j</groupId>
<artifactId>slf4j-api</artifactId>
<version>${slf4j.version}</version>
</dependency>
<!-- JUnit -->
<dependency>
<groupId>junit</groupId>
<artifactId>junit</artifactId>
<version>${junit.version}</version>
<scope>test</scope>
</dependency>
<!-- ActiveMQ -->
<dependency>
<groupId>org.apache.activemq</groupId>
<artifactId>activemq-all</artifactId>
<version>${activemq.version}</version>
</dependency>
</dependencies>

<build>
<plugins>
<plugin>
<groupId>org.apache.maven.plugins</groupId>
<artifactId>maven-compiler-plugin</artifactId>
<version>${maven-compiler-plugin.version}</version>
<configuration>
<source>${java.version}</source>
<target>${java.version}</target>
</configuration>
</plugin>
</plugins>
</build>
</project>

The Producer class contains a constructor which creates a message producer and needed connection and session objects. The sendName() operation takes as input a first and last name which are set on a TextMessage which in turn is sent to the queue set on the message producer.
package info.source4code.jms.activemq.ptp;

import javax.jms.Connection;
import javax.jms.ConnectionFactory;
import javax.jms.JMSException;
import javax.jms.MessageProducer;
import javax.jms.Queue;
import javax.jms.Session;
import javax.jms.TextMessage;

import org.apache.activemq.ActiveMQConnection;
import org.apache.activemq.ActiveMQConnectionFactory;
import org.slf4j.Logger;
import org.slf4j.LoggerFactory;

public class Producer {

private static final Logger LOGGER = LoggerFactory
.getLogger(Producer.class);

private String clientId;
private Connection connection;
private Session session;
private MessageProducer messageProducer;

public void create(String clientId, String queueName) throws JMSException {
this.clientId = clientId;

// create a Connection Factory
ConnectionFactory connectionFactory = new ActiveMQConnectionFactory(
ActiveMQConnection.DEFAULT_BROKER_URL);

// create a Connection
connection = connectionFactory.createConnection();
connection.setClientID(clientId);

// create a Session
session = connection.createSession(false, Session.AUTO_ACKNOWLEDGE);

// create the Queue to which messages will be sent
Queue queue = session.createQueue(queueName);

// create a MessageProducer for sending messages
messageProducer = session.createProducer(queue);
}

public void closeConnection() throws JMSException {
connection.close();
}

public void sendName(String firstName, String lastName) throws JMSException {
String text = firstName + " " + lastName;

// create a JMS TextMessage
TextMessage textMessage = session.createTextMessage(text);

// send the message to the queue destination
messageProducer.send(textMessage);

LOGGER.debug(clientId + ": sent message with text='{}'", text);
}
}

The Consumer class contains a constructor which creates a message consumer and needed connection and session objects. A key difference with the JMS Hello World example is that the Session object is created with the Session.CLIENT_ACKNOWLEDGE parameter which requires a client to explicitly acknowledge a consumed message by calling the message's acknowledge() method.

The getGreeting() operation reads a message from the queue and creates a greeting which is returned. Aside from the timeout parameter an additional acknowledge parameter is passed which is used to determine whether the received message should be acknowledged or not.
package info.source4code.jms.activemq.ptp;

import javax.jms.Connection;
import javax.jms.ConnectionFactory;
import javax.jms.JMSException;
import javax.jms.Message;
import javax.jms.MessageConsumer;
import javax.jms.Queue;
import javax.jms.Session;
import javax.jms.TextMessage;

import org.apache.activemq.ActiveMQConnection;
import org.apache.activemq.ActiveMQConnectionFactory;
import org.slf4j.Logger;
import org.slf4j.LoggerFactory;

public class Consumer {

private static final Logger LOGGER = LoggerFactory
.getLogger(Consumer.class);

private static String NO_GREETING = "no greeting";

private String clientId;
private Connection connection;
private Session session;
private MessageConsumer messageConsumer;

public void create(String clientId, String queueName) throws JMSException {
this.clientId = clientId;

// create a Connection Factory
ConnectionFactory connectionFactory = new ActiveMQConnectionFactory(
ActiveMQConnection.DEFAULT_BROKER_URL);

// create a Connection
connection = connectionFactory.createConnection();
connection.setClientID(clientId);

// create a Session
session = connection.createSession(false, Session.CLIENT_ACKNOWLEDGE);

// create the Queue from which messages will be received
Queue queue = session.createQueue(queueName);

// create a MessageConsumer for receiving messages
messageConsumer = session.createConsumer(queue);

// start the connection in order to receive messages
connection.start();
}

public void closeConnection() throws JMSException {
connection.close();
}

public String getGreeting(int timeout, boolean acknowledge)
throws JMSException {

String greeting = NO_GREETING;

// read a message from the queue destination
Message message = messageConsumer.receive(timeout);

// check if a message was received
if (message != null) {
// cast the message to the correct type
TextMessage textMessage = (TextMessage) message;

// retrieve the message content
String text = textMessage.getText();
LOGGER.debug(clientId + ": received message with text='{}'", text);

if (acknowledge) {
// acknowledge the successful processing of the message
message.acknowledge();
LOGGER.debug(clientId + ": message acknowledged");
} else {
LOGGER.debug(clientId + ": message not acknowledged");
}

// create greeting
greeting = "Hello " + text + "!";
} else {
LOGGER.debug(clientId + ": no message received");
}

LOGGER.info("greeting={}", greeting);
return greeting;
}
}

The below JUnit test class will be used to illustrate the PTP messaging characteristics mentioned at the beginning of this post. The testGreeting() test case verifies the correct working of the getGreeting() method of the Consumer class.

The testOnlyOneConsumer() test case will verify that a message is read by only one consumer. The first consumer will receive the greeting and the second consumer will receive nothing.

The testNoTimingDependencies() test case illustrates that the consumer can successfully receive a message even if that consumer is created after the message was sent.

Finally the testAcknowledgeProcessing() test case will verify that a message is not removed by the JMS provider in case it was not acknowledged by the consumer. In order to simulate this we first call the getGreeting() method with the acknowledge parameter set to false. Then the getGreeting() method is called a second time and as the first call did not acknowledge the message it is still available on the queue.
package info.source4code.jms.activemq.ptp;

import static org.junit.Assert.assertEquals;
import static org.junit.Assert.fail;

import javax.jms.JMSException;
import javax.naming.NamingException;

import org.junit.AfterClass;
import org.junit.BeforeClass;
import org.junit.Test;

public class ConsumerTest {

private static Producer producerPointToPoint, producerOnlyOneConsumer,
producerNoTimingDependencies, producerAcknowledgeProcessing;
private static Consumer consumerPointToPoint, consumer1OnlyOneConsumer,
consumer2OnlyOneConsumer, consumerNoTimingDependencies,
consumer1AcknowledgeProcessing, consumer2AcknowledgeProcessing;

@BeforeClass
public static void setUpBeforeClass() throws JMSException, NamingException {
producerPointToPoint = new Producer();
producerPointToPoint.create("producer-pointtopoint", "pointtopoint.q");

producerOnlyOneConsumer = new Producer();
producerOnlyOneConsumer.create("producer-onlyoneconsumer",
"onlyoneconsumer.q");

producerNoTimingDependencies = new Producer();
producerNoTimingDependencies.create("producer-notimingdependencies",
"notimingdependencies.q");

producerAcknowledgeProcessing = new Producer();
producerAcknowledgeProcessing.create("producer-acknowledgeprocessing",
"acknowledgeprocessing.q");

consumerPointToPoint = new Consumer();
consumerPointToPoint.create("consumer-pointtopoint", "pointtopoint.q");

consumer1OnlyOneConsumer = new Consumer();
consumer1OnlyOneConsumer.create("consumer1-onlyoneconsumer",
"onlyoneconsumer.q");

consumer2OnlyOneConsumer = new Consumer();
consumer2OnlyOneConsumer.create("consumer2-onlyoneconsumer",
"onlyoneconsumer.q");

// consumerNoTimingDependencies

consumer1AcknowledgeProcessing = new Consumer();
consumer1AcknowledgeProcessing.create(
"consumer1-acknowledgeprocessing", "acknowledgeprocessing.q");

consumer2AcknowledgeProcessing = new Consumer();
consumer2AcknowledgeProcessing.create(
"consumer2-acknowledgeprocessing", "acknowledgeprocessing.q");
}

@AfterClass
public static void tearDownAfterClass() throws JMSException {
producerPointToPoint.closeConnection();
producerOnlyOneConsumer.closeConnection();
producerNoTimingDependencies.closeConnection();
producerAcknowledgeProcessing.closeConnection();

consumerPointToPoint.closeConnection();
consumer1OnlyOneConsumer.closeConnection();
consumer2OnlyOneConsumer.closeConnection();
consumerNoTimingDependencies.closeConnection();
// consumer1AcknowledgeProcessing
consumer2AcknowledgeProcessing.closeConnection();
}

@Test
public void testGetGreeting() {
try {
producerPointToPoint.sendName("Frodo", "Baggins");

String greeting = consumerPointToPoint.getGreeting(1000, true);
assertEquals("Hello Frodo Baggins!", greeting);

} catch (JMSException e) {
fail("a JMS Exception occurred");
}
}

@Test
public void testOnlyOneConsumer() throws InterruptedException {
try {
producerOnlyOneConsumer.sendName("Legolas", "Greenleaf");

String greeting1 = consumer1OnlyOneConsumer.getGreeting(1000, true);
assertEquals("Hello Legolas Greenleaf!", greeting1);

Thread.sleep(1000);

String greeting2 = consumer2OnlyOneConsumer.getGreeting(1000, true);
// each message has only one consumer
assertEquals("no greeting", greeting2);

} catch (JMSException e) {
fail("a JMS Exception occurred");
}
}

@Test
public void testNoTimingDependencies() {
try {
producerNoTimingDependencies.sendName("Samwise", "Gamgee");
// a receiver can fetch the message whether or not it was running
// when the client sent the message
consumerNoTimingDependencies = new Consumer();
consumerNoTimingDependencies.create(
"consumer-notimingdependencies", "notimingdependencies.q");

String greeting = consumerNoTimingDependencies.getGreeting(1000,
true);
assertEquals("Hello Samwise Gamgee!", greeting);

} catch (JMSException e) {
fail("a JMS Exception occurred");
}
}

@Test
public void testAcknowledgeProcessing() throws InterruptedException {
try {
producerAcknowledgeProcessing.sendName("Gandalf", "the Grey");

// consume the message without an acknowledgment
String greeting1 = consumer1AcknowledgeProcessing.getGreeting(1000,
false);
assertEquals("Hello Gandalf the Grey!", greeting1);

// close the MessageConsumer so the broker knows there is no
// acknowledgment
consumer1AcknowledgeProcessing.closeConnection();

String greeting2 = consumer2AcknowledgeProcessing.getGreeting(1000,
true);
assertEquals("Hello Gandalf the Grey!", greeting2);

} catch (JMSException e) {
fail("a JMS Exception occurred");
}
}
}

Make sure a default ActiveMQ message broker is up and running, open a command prompt and execute following Maven command:
mvn test

This will trigger Maven to run the above test cases which should result in the following log statements.
20:53:01.069 DEBUG [main][Producer]
producer-onlyoneconsumer: sent message with text='Legolas Greenleaf'
20:53:01.076 DEBUG [main][Consumer]
consumer1-onlyoneconsumer: received message with text='Legolas Greenleaf'
20:53:01.077 DEBUG [main][Consumer]
consumer1-onlyoneconsumer: message acknowledged
20:53:01.077 INFO [main][Consumer]
greeting=Hello Legolas Greenleaf!
20:53:03.078 DEBUG [main][Consumer]
consumer2-onlyoneconsumer: no message received
20:53:03.078 INFO [main][Consumer]
greeting=no greeting
20:53:03.110 DEBUG [main][Producer]
producer-notimingdependencies: sent message with text='Samwise Gamgee'
20:53:03.133 DEBUG [main][Consumer]
consumer-notimingdependencies: received message with text='Samwise Gamgee'
20:53:03.133 DEBUG [main][Consumer]
consumer-notimingdependencies: message acknowledged
20:53:03.134 INFO [main][Consumer]
greeting=Hello Samwise Gamgee!
20:53:03.181 DEBUG [main][Producer]
producer-acknowledgeprocessing: sent message with text='Gandalf the Grey'
20:53:03.181 DEBUG [main][Consumer]
consumer1-acknowledgeprocessing: received message with text='Gandalf the Grey'
20:53:03.181 DEBUG [main][Consumer]
consumer1-acknowledgeprocessing: message not acknowledged
20:53:03.182 INFO [main][Consumer]
greeting=Hello Gandalf the Grey!
20:53:03.189 DEBUG [main][Consumer]
consumer2-acknowledgeprocessing: received message with text='Gandalf the Grey'
20:53:03.189 DEBUG [main][Consumer]
consumer2-acknowledgeprocessing: message acknowledged
20:53:03.189 INFO [main][Consumer]
greeting=Hello Gandalf the Grey!
20:53:03.217 DEBUG [main][Producer]
producer-pointtopoint: sent message with text='Frodo Baggins'
20:53:03.217 DEBUG [main][Consumer]
consumer-pointtopoint: received message with text='Frodo Baggins'
20:53:03.217 DEBUG [main][Consumer]
consumer-pointtopoint: message acknowledged
20:53:03.218 INFO [main][Consumer]
greeting=Hello Frodo Baggins!
Tests run: 4, Failures: 0, Errors: 0, Skipped: 0, Time elapsed: 2.758 sec

Results :

Tests run: 4, Failures: 0, Errors: 0, Skipped: 0


github icon
If you would like to run the above code sample you can download the full source code and their corresponding JUnit test cases here.

This concludes the JMS point-to-point example using ActiveMQ. If you found this post helpful or have any questions or remarks, please leave a comment.

Thursday, October 16, 2014

JMS - Hello World using ActiveMQ

jms logo
The Java Message Service (JMS) API is a Java Message Oriented Middleware (MOM) API for sending messages between two or more clients. It is a Java API that allows applications to create, send, receive, and read messages. The JMS API enables communication that is loosely coupled, asynchronous and reliable. The current version of the JMS specification is version 1.1. The following post introduces the basic JMS concepts and illustrates them with a JMS Hello World example using ActiveMQ and Maven.


To use JMS, one must have a JMS provider that can manage the sessions, queues and topics. Some examples of known JMS providers are Apache ActiveMQ, WebSphere MQ from IBM or SonicMQ from Aurea Software. Starting from Java EE version 1.4, a JMS provider has to be contained in all Java EE application servers.

The JMS API Programming Model

jms api programming model

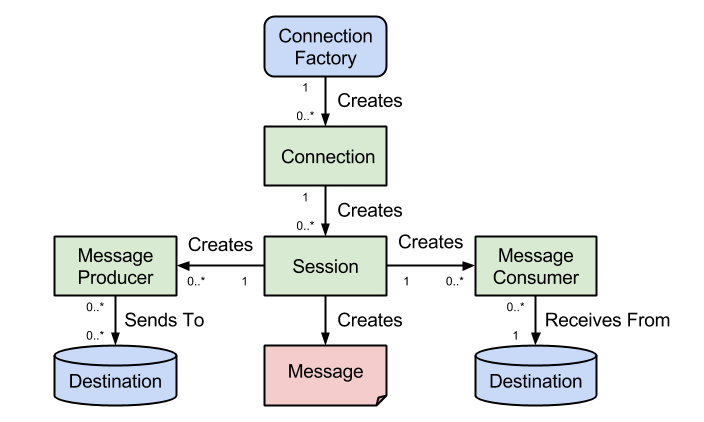
The basic building blocks of the JMS API programming model are shown above. At the top we have the ConnectionFactory object which is the object a client uses to create a connection to a JMS provider. A connection factory encapsulates a set of connection configuration parameters like for example the broker URL. A connection factory is a JMS administered object that is typically created by an administrator and later used by JMS clients.

When you have a ConnectionFactory object, you can use it to create a connection. A Connection object encapsulates a virtual connection with a JMS provider. For example, a connection could represent an open TCP/IP socket between a client and a provider service daemon. Before an application completes, it must close any connections that were created. Failure to close a connection can cause resources not to be released by the JMS provider.
Closing a connection also closes its sessions and their message producers/message consumers.
A session is a single-threaded context for producing and consuming messages. A session provides a transactional context with which to group a set of sends and receives into an atomic unit of work. Session objects are created on top of connections.
As mentioned above, it is important to note that everything from a session down is single-threaded!
A MessageProducer is an object that is created by a session and used for sending messages to a destination. You use a Session object to create a message producer for a destination.
It is possible to create an unidentified producer by specifying a null Destination as argument to the createProducer() method. When sending a message, overload the send method with the needed destination as the first parameter.
A MessageConsumer is an object that is created by a session and used for receiving messages sent to a destination. After you have created a message consumer it becomes active, and you can use it to receive messages. Message delivery does not begin until you start the connection you created by calling its start() method.
Remember to always to call the start() method on the Connection object in order to receive messages!
A Destination is the object a client uses to specify the target of messages it produces and the source of messages it consumes. In the point-to-point messaging domain, destinations are called queues. In the publish/subscribe messaging domain, destinations are called topics.

For more detailed information please check the JMS API programming model chapter of the Java EE 6 tutorial.

ActiveMQ Example

Let's illustrate the above by creating a message producer that sends a message containing a first and last name to a Hello World queue. In turn a message consumer will read the message and transform it into a greeting. The example uses Maven and assumes a default ActiveMQ message broker is up and running.

Tools used:
  • ActiveMQ 5.10
  • Maven 3

First let's look at the below Maven POM file which contains the needed dependencies for Logback, JUnit and ActiveMQ.
<?xml version="1.0" encoding="UTF-8"?>
<project xmlns="http://maven.apache.org/POM/4.0.0" xmlns:xsi="http://www.w3.org/2001/XMLSchema-instance"
xsi:schemaLocation="http://maven.apache.org/POM/4.0.0 http://maven.apache.org/xsd/maven-4.0.0.xsd">
<modelVersion>4.0.0</modelVersion>

<groupId>info.source4code</groupId>
<artifactId>jms-activemq-helloworld</artifactId>
<version>1.0</version>
<packaging>jar</packaging>

<name>JMS - Hello World using ActiveMQ</name>
<url>http://www.source4code.info/2014/10/jms-hello-world-using-activemq.html</url>

<properties>
<project.build.sourceEncoding>UTF-8</project.build.sourceEncoding>
<java.version>1.6</java.version>

<logback.version>1.1.2</logback.version>
<slf4j.version>1.7.7</slf4j.version>
<junit.version>4.12-beta-2</junit.version>
<activemq.version>5.10.0</activemq.version>

<maven-compiler-plugin.version>3.1</maven-compiler-plugin.version>
</properties>

<dependencies>
<!-- Logging -->
<dependency>
<groupId>ch.qos.logback</groupId>
<artifactId>logback-classic</artifactId>
<version>${logback.version}</version>
</dependency>
<dependency>
<groupId>org.slf4j</groupId>
<artifactId>slf4j-api</artifactId>
<version>${slf4j.version}</version>
</dependency>
<!-- JUnit -->
<dependency>
<groupId>junit</groupId>
<artifactId>junit</artifactId>
<version>${junit.version}</version>
<scope>test</scope>
</dependency>
<!-- ActiveMQ -->
<dependency>
<groupId>org.apache.activemq</groupId>
<artifactId>activemq-all</artifactId>
<version>${activemq.version}</version>
</dependency>
</dependencies>

<build>
<plugins>
<plugin>
<groupId>org.apache.maven.plugins</groupId>
<artifactId>maven-compiler-plugin</artifactId>
<version>${maven-compiler-plugin.version}</version>
<configuration>
<source>${java.version}</source>
<target>${java.version}</target>
</configuration>
</plugin>
</plugins>
</build>
</project>

The Producer class below illustrates how to use the JMS API programming model. The create() method will first create an instance of the ConnectionFactory which is in turn used to create a connection to ActiveMQ using the default broker URL. Using the Connection instance, a Session is created which is used to create a Destination and MessageProducer instance. The destination type in the below example is a queue.

The class also contains a close() method which allows to correctly release the resources at the JMS provider. The depending Session and MessageProducer objects are automatically closed when calling this method.

The sendName() method takes as input a first and last name and concatenates them into a single string. Using the session a JMS TextMessage is created on which the string is set. Using the message producer the message is sent to the JMS provider.
package info.source4code.jms;

import javax.jms.Connection;
import javax.jms.ConnectionFactory;
import javax.jms.Destination;
import javax.jms.JMSException;
import javax.jms.MessageProducer;
import javax.jms.Session;
import javax.jms.TextMessage;

import org.apache.activemq.ActiveMQConnection;
import org.apache.activemq.ActiveMQConnectionFactory;
import org.slf4j.Logger;
import org.slf4j.LoggerFactory;

public class Producer {

private static final Logger LOGGER = LoggerFactory
.getLogger(Producer.class);

private Connection connection;
private Session session;
private MessageProducer messageProducer;

public void create(String destinationName) throws JMSException {

// create a Connection Factory
ConnectionFactory connectionFactory = new ActiveMQConnectionFactory(
ActiveMQConnection.DEFAULT_BROKER_URL);

// create a Connection
connection = connectionFactory.createConnection();

// create a Session
session = connection.createSession(false, Session.AUTO_ACKNOWLEDGE);

// create the Destination to which messages will be sent
Destination destination = session.createQueue(destinationName);

// create a Message Producer for sending messages
messageProducer = session.createProducer(destination);
}

public void close() throws JMSException {
connection.close();
}

public void sendName(String firstName, String lastName) throws JMSException {

String text = firstName + " " + lastName;

// create a JMS TextMessage
TextMessage textMessage = session.createTextMessage(text);

// send the message to the queue destination
messageProducer.send(textMessage);

LOGGER.debug("producer sent message with text='{}'", text);
}
}

For receiving messages, a Consumer class is defined which has the same create() and close() methods as the above Producer. The main difference is that in the case of a message consumer the connection is started.

The getGreeting() method will receive the next message from the destination that was configured on the message consumer. A timeout parameter is passed to the receive() method in order to avoid waiting for an indefinite amount of time in case no message is present on the destination. As a result a check is needed to see if the receive() method returned a message or null.

If a message was received it is cast to a TextMessage and the received text is converted into a greeting that is returned. In case the message was null a default "no greeting" is returned.
package info.source4code.jms;

import javax.jms.Connection;
import javax.jms.ConnectionFactory;
import javax.jms.Destination;
import javax.jms.JMSException;
import javax.jms.Message;
import javax.jms.MessageConsumer;
import javax.jms.Session;
import javax.jms.TextMessage;

import org.apache.activemq.ActiveMQConnection;
import org.apache.activemq.ActiveMQConnectionFactory;
import org.slf4j.Logger;
import org.slf4j.LoggerFactory;

public class Consumer {

private static final Logger LOGGER = LoggerFactory
.getLogger(Consumer.class);

private static String NO_GREETING = "no greeting";

private Connection connection;
private Session session;
private MessageConsumer messageConsumer;

public void create(String destinationName) throws JMSException {

// create a Connection Factory
ConnectionFactory connectionFactory = new ActiveMQConnectionFactory(
ActiveMQConnection.DEFAULT_BROKER_URL);

// create a Connection
connection = connectionFactory.createConnection();

// create a Session
session = connection.createSession(false, Session.AUTO_ACKNOWLEDGE);

// create the Destination from which messages will be received
Destination destination = session.createQueue(destinationName);

// create a Message Consumer for receiving messages
messageConsumer = session.createConsumer(destination);

// start the connection in order to receive messages
connection.start();
}

public void close() throws JMSException {
connection.close();
}

public String getGreeting(int timeout) throws JMSException {

String greeting = NO_GREETING;

// read a message from the queue destination
Message message = messageConsumer.receive(timeout);

// check if a message was received
if (message != null) {
// cast the message to the correct type
TextMessage textMessage = (TextMessage) message;

// retrieve the message content
String text = textMessage.getText();
LOGGER.debug("consumer received message with text='{}'", text);

// create greeting
greeting = "Hello " + text + "!";
} else {
LOGGER.debug("consumer received no message");
}

LOGGER.info("greeting={}", greeting);
return greeting;
}
}

In order to test above classes, below JUnit test class is created which contains two test cases. The first is a testGetGreeting() test case in which the producer is used to send a first and last name. Using the consumer the sent message is read and converted into a greeting. The second testNoGreeting() test case verifies the correct working of reading a destination when it contains no messages and as such "no greeting" is returned.
package info.source4code.jms;

import static org.junit.Assert.assertEquals;
import static org.junit.Assert.fail;

import javax.jms.JMSException;

import org.junit.AfterClass;
import org.junit.BeforeClass;
import org.junit.Test;

public class ProducerTest {

private static Producer producer;
private static Consumer consumer;

@BeforeClass
public static void setUpBeforeClass() throws JMSException {
producer = new Producer();
producer.create("helloworld.q");

consumer = new Consumer();
consumer.create("helloworld.q");
}

@AfterClass
public static void tearDownAfterClass() throws JMSException {
producer.close();
consumer.close();
}

@Test
public void testGetGreeting() {
try {
producer.sendName("John", "Doe");

String greeting = consumer.getGreeting(1000);
assertEquals("Hello John Doe!", greeting);

} catch (JMSException e) {
fail("a JMS Exception occurred");
}
}

@Test
public void testNoGreeting() {
try {
String greeting = consumer.getGreeting(1000);
assertEquals("no greeting", greeting);

} catch (JMSException e) {
fail("a JMS Exception occurred");
}
}
}

Make sure a default ActiveMQ message broker is up and running, open a command prompt and execute following Maven command:
mvn test

This will trigger Maven to run the above test case and will result in the following log statements.
13:38:19.844 DEBUG [main][Consumer]
consumer received no message
13:38:19.858 INFO [main][Consumer]
greeting=no greeting
13:38:19.911 DEBUG [main][Producer]
producer sent message with text='John Doe'
13:38:19.912 DEBUG [main][Consumer]
consumer received message with text='John Doe'
13:38:19.912 INFO [main][Consumer]
greeting=Hello John Doe!
Tests run: 2, Failures: 0, Errors: 0, Skipped: 0, Time elapsed: 1.579 sec


github icon
If you would like to run the above code sample you can download the full source code and their corresponding JUnit test cases here.

This concludes the JMS Hello World example using ActiveMQ. Note that the code also contains a UnidentifiedProducer class and corresponding JUnit test class which illustrates the overloading of the send() method with the needed destination. If you found this post helpful or have any questions or remarks, please leave a comment.

Sunday, September 21, 2014

JAX-WS - CXF logging request and response SOAP messages using Logback

apache cxf logo
CXF uses Java SE Logging for both client- and server-side logging of SOAP requests and responses. Logging is activated by use of separate in/out interceptors that can be attached to the requester and/or provider as required. These interceptors can be specified either programmatically (via Java code and/or annotations) or via use of configuration files. The following code sample shows how to configure CXF interceptors using Logback for the Hello World web service from a previous post.

Tools used:
  • CXF 3.0
  • Spring 4.1
  • Logback 1.1
  • Jetty 8
  • Maven 3

Specifying the interceptors via configuration files offers two benefits over programmatic configuration:
  1. Logging requirements can be altered without needing to recompile the code
  2. No Apache CXF-specific APIs need to be added to your code, which helps it remain interoperable with other JAX-WS compliant web service stacks

For this example Logback will be used which is a successor to the Log4j project. As a best practice the CXF java.util.logging calls will first be redirected to SLF4J (Simple Logging Facade for Java) as described here. In other words a 'META-INF/cxf/org.apache.cxf.Logger' file will be created on the classpath containing the following:
org.apache.cxf.common.logging.Slf4jLogger

As the Hello World example uses Spring, the commons-logging calls from the Spring framework will also be redirected to SLF4J using jcl-over-slf4j. Now that all logging calls of both CXF and Spring are redirected to SLF4J, Logback will receive them automatically as it natively implements SLF4J. The picture below illustrates the described approach.
cxf logging using logback

The below Maven POM file contains the needed dependencies for the SLF4 bridge (jcl-over-slf4j) and Logback (logback-classic). In addition it contains all other needed dependencies and plugins needed in order to run the example.
<?xml version="1.0" encoding="UTF-8"?>
<project xmlns="http://maven.apache.org/POM/4.0.0" xmlns:xsi="http://www.w3.org/2001/XMLSchema-instance"
xsi:schemaLocation="http://maven.apache.org/POM/4.0.0 http://maven.apache.org/xsd/maven-4.0.0.xsd">
<modelVersion>4.0.0</modelVersion>

<groupId>info.source4code</groupId>
<artifactId>jaxws-jetty-cxf-logging-logback</artifactId>
<version>1.0</version>
<packaging>war</packaging>

<name>JAX-WS - CXF logging request and response SOAP messages using Logback</name>
<url>http://www.source4code.info/2014/09/jaxws-cxf-logging-request-response-soap-messages-logback.html</url>

<prerequisites>
<maven>3.0</maven>
</prerequisites>

<properties>
<project.build.sourceEncoding>UTF-8</project.build.sourceEncoding>
<java.version>1.6</java.version>

<slf4j.version>1.7.10</slf4j.version>
<logback.version>1.1.2</logback.version>
<junit.version>4.12</junit.version>
<cxf.version>3.0.3</cxf.version>
<spring.version>4.1.4.RELEASE</spring.version>

<maven-compiler-plugin.version>3.1</maven-compiler-plugin.version>
<jetty-maven-plugin.version>8.1.16.v20140903</jetty-maven-plugin.version>
<maven-failsafe-plugin.version>2.17</maven-failsafe-plugin.version>
</properties>

<dependencies>
<!-- Logging -->
<dependency>
<groupId>org.slf4j</groupId>
<artifactId>jcl-over-slf4j</artifactId>
<version>${slf4j.version}</version>
</dependency>
<dependency>
<groupId>ch.qos.logback</groupId>
<artifactId>logback-classic</artifactId>
<version>${logback.version}</version>
</dependency>
<!-- JUnit -->
<dependency>
<groupId>junit</groupId>
<artifactId>junit</artifactId>
<version>${junit.version}</version>
<scope>test</scope>
</dependency>
<!-- CXF -->
<dependency>
<groupId>org.apache.cxf</groupId>
<artifactId>cxf-rt-frontend-jaxws</artifactId>
<version>${cxf.version}</version>
</dependency>
<dependency>
<groupId>org.apache.cxf</groupId>
<artifactId>cxf-rt-transports-http</artifactId>
<version>${cxf.version}</version>
</dependency>
<dependency>
<groupId>org.apache.cxf</groupId>
<!-- Jetty is needed if you're are not using the CXFServlet -->
<artifactId>cxf-rt-transports-http-jetty</artifactId>
<version>${cxf.version}</version>
</dependency>
<!-- Spring -->
<dependency>
<groupId>org.springframework</groupId>
<artifactId>spring-context</artifactId>
<version>${spring.version}</version>
<exclusions>
<exclusion>
<artifactId>commons-logging</artifactId>
<groupId>commons-logging</groupId>
</exclusion>
</exclusions>
</dependency>
<dependency>
<groupId>org.springframework</groupId>
<artifactId>spring-web</artifactId>
<version>${spring.version}</version>
<exclusions>
<exclusion>
<artifactId>commons-logging</artifactId>
<groupId>commons-logging</groupId>
</exclusion>
</exclusions>
</dependency>
<dependency>
<groupId>org.springframework</groupId>
<artifactId>spring-test</artifactId>
<version>${spring.version}</version>
<scope>test</scope>
<exclusions>
<exclusion>
<artifactId>commons-logging</artifactId>
<groupId>commons-logging</groupId>
</exclusion>
</exclusions>
</dependency>
</dependencies>

<build>
<plugins>
<plugin>
<groupId>org.apache.maven.plugins</groupId>
<artifactId>maven-compiler-plugin</artifactId>
<version>${maven-compiler-plugin.version}</version>
<configuration>
<source>${java.version}</source>
<target>${java.version}</target>
</configuration>
</plugin>
<!-- jetty-maven-plugin -->
<plugin>
<groupId>org.mortbay.jetty</groupId>
<artifactId>jetty-maven-plugin</artifactId>
<version>${jetty-maven-plugin.version}</version>
<configuration>
<connectors>
<connector
implementation="org.eclipse.jetty.server.nio.SelectChannelConnector">
<port>9090</port>
</connector>
</connectors>
<stopPort>8005</stopPort>
<stopKey>STOP</stopKey>
<daemon>true</daemon>
</configuration>
<executions>
<execution>
<id>start-jetty</id>
<phase>pre-integration-test</phase>
<goals>
<goal>start</goal>
</goals>
</execution>
<execution>
<id>stop-jetty</id>
<phase>post-integration-test</phase>
<goals>
<goal>stop</goal>
</goals>
</execution>
</executions>
</plugin>
<!-- maven-failsafe-plugin -->
<plugin>
<groupId>org.apache.maven.plugins</groupId>
<artifactId>maven-failsafe-plugin</artifactId>
<version>${maven-failsafe-plugin.version}</version>
<executions>
<execution>
<goals>
<goal>integration-test</goal>
<goal>verify</goal>
</goals>
</execution>
</executions>
</plugin>
<!-- cxf-codegen-plugin -->
<plugin>
<groupId>org.apache.cxf</groupId>
<artifactId>cxf-codegen-plugin</artifactId>
<version>${cxf.version}</version>
<executions>
<execution>
<id>generate-sources</id>
<phase>generate-sources</phase>
<configuration>
<sourceRoot>${project.build.directory}/generated/cxf</sourceRoot>
<wsdlOptions>
<wsdlOption>
<wsdl>${project.basedir}/src/main/resources/wsdl/helloworld.wsdl</wsdl>
<wsdlLocation>classpath:wsdl/helloworld.wsdl</wsdlLocation>
</wsdlOption>
</wsdlOptions>
</configuration>
<goals>
<goal>wsdl2java</goal>
</goals>
</execution>
</executions>
</plugin>
</plugins>
</build>
</project>

Logback Configuration

Logback can be configured either programmatically or with a configuration script expressed in XML or Groovy format. For this example a configuration script in XML is used as shown below. The script will write all logging events to a file except for the request and response SOAP messages that will be written to a different file.

After defining some properties that contain the layout pattern and file names, two appenders are configured to write logging events to a rolling file. The first file 'jaxws-jetty-cxf-logging.log' will contain all log events except for the ones emitted by the CXF logging interceptors as these are going to be written to 'jaxws-jetty-cxf-logging-ws.log'.

The last section contains the different loggers and the level at which information is logged. The log level of the 'org.apache.cxf.services' logger needs to be set to INFO in order to activate the SOAP logging events. In addition the WS_LOG_FILE appender needs to be referenced in order to write the SOAP logging events to a different file. Note the additivity="false" which makes sure the log events are not written to appenders attached to its ancestors (in this case APP_LOG_FILE).
<?xml version="1.0" encoding="UTF-8"?>
<configuration scan="true" scanPeriod="60 seconds">

<!-- PROPERTIES -->
<property name="layout" value="%d{HH:mm:ss.SSS} %-5level [%thread][%logger{0}] %m%n" />
<property name="logFile" value="jaxws-jetty-cxf-logging" />
<property name="logFile-ws" value="jaxws-jetty-cxf-logging-ws" />

<!-- APPENDERS -->
<appender name="APP_LOG_FILE" class="ch.qos.logback.core.rolling.RollingFileAppender">
<File>${logFile}.log</File>
<rollingPolicy class="ch.qos.logback.core.rolling.TimeBasedRollingPolicy">
<fileNamePattern>${logFile}.%d{yyyy-MM-dd}.log</fileNamePattern>
<maxHistory>30</maxHistory>
</rollingPolicy>
<encoder>
<pattern>${layout}</pattern>
</encoder>
</appender>

<appender name="WS_LOG_FILE" class="ch.qos.logback.core.rolling.RollingFileAppender">
<file>${logFile-ws}.log</file>
<rollingPolicy class="ch.qos.logback.core.rolling.TimeBasedRollingPolicy">
<fileNamePattern>${logFile-ws}.%d{yyyy-MM-dd}.log</fileNamePattern>
<maxHistory>30</maxHistory>
</rollingPolicy>
<encoder>
<pattern>${layout}</pattern>
</encoder>
</appender>

<!-- LOGGERS -->
<logger name="info.source4code.soap.http.cxf" level="INFO" />

<logger name="org.springframework" level="WARN" />
<logger name="org.apache.cxf" level="WARN" />

<!-- level INFO needed to log SOAP messages -->
<logger name="org.apache.cxf.services" level="INFO"
additivity="false">
<!-- specify a dedicated appender for the SOAP messages -->
<appender-ref ref="WS_LOG_FILE" />
</logger>

<!-- APPLICATION LOG LEVEL -->
<root level="WARN">
<appender-ref ref="APP_LOG_FILE" />
</root>

</configuration>

Requester

In order to activate the logging interceptors provided by the CXF framework, there are two options. For the requester(client) the option where all logging interceptors are configured manually will be illustrated. The other option, where the logging feature is used to configure all interceptors, will be shown in the provider section down below. For more information on the difference between interceptors and features check out this post.

First an instance of the abstract AbstractLoggingInterceptor class is created to enable pretty printing of the SOAP messages. Next, instances of the LoggingInInterceptor and LoggingOutInterceptor are specified which have as parent the previously defined abstractLoggingInterceptor instance. In a last step the interceptors are added to the CXF bus, which is the backbone of the CXF architecture that manages the respective inbound and outbound message and fault interceptor chains for all client and server endpoints. The interceptors are added to both in/out and respective fault interceptor chains as shown below.
Note that interceptors can be added to a client, server or bus.
<?xml version="1.0" encoding="UTF-8"?>
<beans xmlns="http://www.springframework.org/schema/beans"
xmlns:xsi="http://www.w3.org/2001/XMLSchema-instance" xmlns:cxf="http://cxf.apache.org/core"
xmlns:jaxws="http://cxf.apache.org/jaxws"
xsi:schemaLocation="
http://www.springframework.org/schema/beans
http://www.springframework.org/schema/beans/spring-beans.xsd
http://cxf.apache.org/core http://cxf.apache.org/schemas/core.xsd
http://cxf.apache.org/jaxws http://cxf.apache.org/schemas/jaxws.xsd">

<jaxws:client id="helloWorldRequesterBean"
serviceClass="info.source4code.services.helloworld.HelloWorldPortType"
address="${helloworld.address}">
</jaxws:client>

<!-- abstractLoggingInterceptor that will enable pretty printing of messages -->
<bean id="abstractLoggingInterceptor" abstract="true">
<property name="prettyLogging" value="true" />
</bean>

<!-- logging interceptors that will log all received/sent messages -->
<bean id="loggingInInterceptor" class="org.apache.cxf.interceptor.LoggingInInterceptor"
parent="abstractLoggingInterceptor">
</bean>
<bean id="loggingOutInterceptor" class="org.apache.cxf.interceptor.LoggingOutInterceptor"
parent="abstractLoggingInterceptor">
</bean>

<!-- add the logging interceptors to the CXF bus -->
<cxf:bus>
<cxf:inInterceptors>
<ref bean="loggingInInterceptor" />
</cxf:inInterceptors>
<cxf:inFaultInterceptors>
<ref bean="loggingInInterceptor" />
</cxf:inFaultInterceptors>
<cxf:outInterceptors>
<ref bean="loggingOutInterceptor" />
</cxf:outInterceptors>
<cxf:outFaultInterceptors>
<ref bean="loggingOutInterceptor" />
</cxf:outFaultInterceptors>
</cxf:bus>

</beans>

Provider

Activating the interceptors at provider(server) side will be done using the LoggingFeature that is supplied with the CXF framework.

First an instance of the abstract LoggingFeature class is created with the prettyLogging set to true in order to enable pretty printing of the SOAP messages. As with the interceptors, the feature is added to the CXF bus in order to activate them as shown below.
Note that features can be added to a client, server or a bus.
<?xml version="1.0" encoding="UTF-8"?>
<beans xmlns="http://www.springframework.org/schema/beans"
xmlns:xsi="http://www.w3.org/2001/XMLSchema-instance" xmlns:cxf="http://cxf.apache.org/core"
xmlns:jaxws="http://cxf.apache.org/jaxws"
xsi:schemaLocation="
http://www.springframework.org/schema/beans
http://www.springframework.org/schema/beans/spring-beans.xsd
http://cxf.apache.org/core http://cxf.apache.org/schemas/core.xsd
http://cxf.apache.org/jaxws http://cxf.apache.org/schemas/jaxws.xsd">

<jaxws:endpoint id="helloWorldProviderBean"
implementor="info.source4code.soap.http.cxf.HelloWorldImpl"
address="/helloworld">
</jaxws:endpoint>

<!-- loggingFeature that will log all received/sent messages -->
<bean id="loggingFeature" class="org.apache.cxf.feature.LoggingFeature">
<property name="prettyLogging" value="true" />
</bean>

<!-- add the loggingFeature to the cxf bus -->
<cxf:bus>
<cxf:features>
<ref bean="loggingFeature" />
</cxf:features>
</cxf:bus>

</beans>

Testing

Testing of the service is done using a unit and an integration test case. For the unit test case the provider is created without Spring (using JaxWsServerFactoryBean), as such the logging feature needs to be added programmatically as shown below.
package info.source4code.soap.http.cxf;

import static org.junit.Assert.assertEquals;
import info.source4code.services.helloworld.Person;

import org.apache.cxf.feature.LoggingFeature;
import org.apache.cxf.jaxws.JaxWsServerFactoryBean;
import org.junit.BeforeClass;
import org.junit.Test;
import org.junit.runner.RunWith;
import org.springframework.beans.factory.annotation.Autowired;
import org.springframework.test.context.ContextConfiguration;
import org.springframework.test.context.junit4.SpringJUnit4ClassRunner;

@RunWith(SpringJUnit4ClassRunner.class)
@ContextConfiguration(locations = { "classpath:/META-INF/spring/context-requester.xml" })
public class HelloWorldImplTest {

private static String ENDPOINT_ADDRESS = "http://localhost:9090/s4c/services/helloworld";

@Autowired
private HelloWorldClient helloWorldClient;

@BeforeClass
public static void setUpBeforeClass() throws Exception {
// start the HelloWorld service using jaxWsServerFactoryBean
JaxWsServerFactoryBean jaxWsServerFactoryBean = new JaxWsServerFactoryBean();

// adding loggingFeature to print the received/sent messages
LoggingFeature loggingFeature = new LoggingFeature();
loggingFeature.setPrettyLogging(true);

jaxWsServerFactoryBean.getFeatures().add(loggingFeature);

// setting the implementation
HelloWorldImpl implementor = new HelloWorldImpl();
jaxWsServerFactoryBean.setServiceBean(implementor);
// setting the endpoint
jaxWsServerFactoryBean.setAddress(ENDPOINT_ADDRESS);
jaxWsServerFactoryBean.create();
}

@Test
public void testSayHello() {
Person person = new Person();
person.setFirstName("John");
person.setLastName("Doe");

assertEquals("Hello John Doe!",
helloWorldClient.sayHello(person));
}
}

Run the example by opening a command prompt and executing following Maven command:
mvn verify

The result should be that a number of log files are created in the project root directory. Amongst these files there should be 'jaxws-jetty-cxf-logging-ws.log' and 'jaxws-jetty-cxf-logging-ws-test.log' which contain the exchanged SOAP messages.
06:26:41.718 INFO  [qtp1766911175-27][HelloWorld_PortType] Inbound Message
----------------------------
ID: 1
Address: http://localhost:9090/s4c/services/helloworld
Encoding: UTF-8
Http-Method: POST
Content-Type: text/xml; charset=UTF-8
Headers: {Accept=[*/*], Cache-Control=[no-cache], connection=[keep-alive], Content-Length=[229], content-type=[text/xml; charset=UTF-8], Host=[localhost:9090], Pragma=[no-cache], SOAPAction=[""], User-Agent=[Apache CXF 3.0.3]}
Payload: <soap:Envelope xmlns:soap="http://schemas.xmlsoap.org/soap/envelope/">
<soap:Body>
<person xmlns="http://source4code.info/services/helloworld">
<firstName>John</firstName>
<lastName>Doe</lastName>
</person>
</soap:Body>
</soap:Envelope>

--------------------------------------
06:26:41.786 INFO [qtp1766911175-27][HelloWorld_PortType] Outbound Message
---------------------------
ID: 1
Response-Code: 200
Encoding: UTF-8
Content-Type: text/xml
Headers: {}
Payload: <soap:Envelope xmlns:soap="http://schemas.xmlsoap.org/soap/envelope/">
<soap:Body>
<greeting xmlns="http://source4code.info/services/helloworld">
<text>Hello John Doe!</text>
</greeting>
</soap:Body>
</soap:Envelope>


github icon
If you would like to run the above code sample you can download the full source code and their corresponding JUnit and integration test cases here.

This concludes the CXF logging request and response messages using Logback example. If you found this post helpful or have any questions or remarks, please leave a comment.