Showing posts with label Tutorial. Show all posts

Tuesday, November 18, 2014

JMS - Install RabbitMQ on Windows

RabbitMQ is an open source message broker software that implements the Advanced Message Queuing Protocol (AMQP). The RabbitMQ server is written in the Erlang programming language and client libraries to interface with the broker are available for all major programming languages. Following tutorial shows how to install RabbitMQ and perform a start/stop of the installed instance on Windows.

Install Erlang

Erlang is a general-purpose concurrent, garbage-collected programming language and runtime system. It was designed by Ericsson to support distributed, fault-tolerant applications. It was originally a proprietary language within Ericsson, but was released as open source in 1998. OTP (Open Telecom Platform) is the open source distribution of Erlang.

First thing to do is to download the OTP binaries. Go the the Erlang download page and click on the Windows binary link for your system (32-bit or 64-bit). At the time of writing the latest stable release was 'otp_win64_17.3.exe'. Note that there are also pre-built packages for platforms such as: Raspbian, Ubuntu, Fedora, OS X, and more.

Double click to run the downloaded '.exe' file and click Next keeping the default settings on the first installer step.

erlang installer welcome

Optionally change the default destination folder and click Next and then Install. In the example below the install location was change to 'D:\source4code\tools\erl6.2'. From now on we will refer to this directory as: [erlang_install_dir].

erlang installer installation path

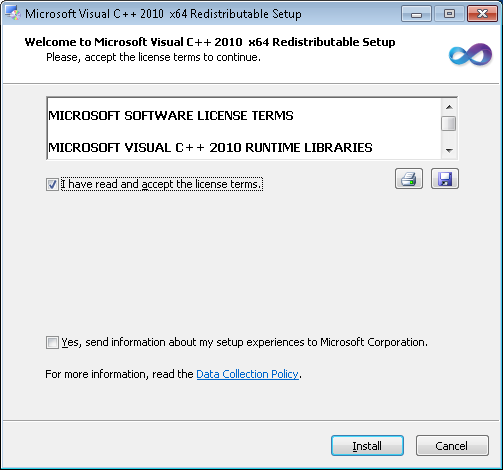
If Microsoft Visual C++ is not already setup on your system, a second installer window will pop-up. Click the 'I have read and accept the license terms' check-box and click Install.

microsoft visual c++ installer

Click Finish when the Microsoft Visual C++ setup is complete and then click Close to finish the OTP installation.

microsoft visual c++ installer completed

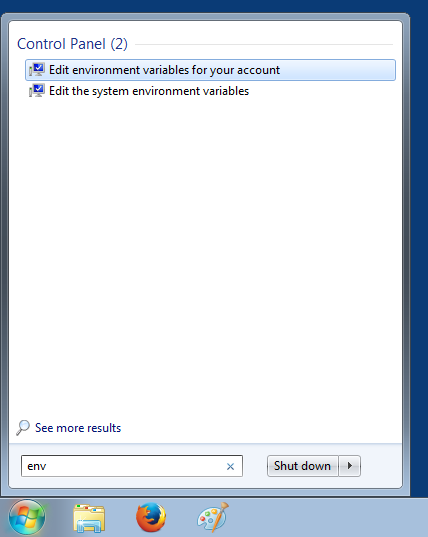
In order for Erlang applications to be able to run we need to setup an 'ERLANG_HOME' environment variable that will point to the Erlang installation directory. When using Windows the above parameters can be configured on the Environment Variables panel. Click on the Windows Start button and enter "env" without quotes as shown below.

edit environment variables for your account

Environment variables can be set at account level or at system level. For this example click on Edit environment variables for your account and following panel should appear.

environment variables panel

Click on the New button and enter "ERLANG_HOME" as variable name and the [erlang_install_dir] as variable value. In this tutorial the installation directory is "D:\source4code\tools\erl6.2". Click OK to to save.

erlang_home user variable

Install RabbitMQ

RabbitMQ can be downloaded from the RabbitMQ download page. There are a number of different download packages available, for this tutorial we will be installing the manual install package on Windows.At the time of writing the latest stable release was 'rabbitmq-server-windows-3.4.1.zip'.

Extract the binaries archive downloaded in the previous step. The extracted root directory should contain a number of files and subdirectories as shown below. From now on we will refer to this directory as: [rabbitmq_install_dir].

In order to start RabbitMQ, open a command prompt by clicking on the Windows Start button and typing "cmd" followed by pressing ENTER. A new command prompt window should open. Navigate to the [rabbitmq_install_dir]/sbin and enter following command:
rabbitmq-server

rabbitmq start command

In order to stop RabbitMQ, open another command prompt at the [rabbitmq_install_dir]/sbin and enter following command:
rabbitmqctl stop

rabbitmq stop command

Setup RabbitMQ

The 'rabbitmq-management' plugin provides a browser-based UI for management and monitoring of the RabbitMQ server . In order to enable the UI, make sure RabbitMQ is running and open a new command prompt at [rabbitmq_install_dir]/sbin in which you enter following:
rabbitmq-plugins enable rabbitmq_management

rabbitmq enable web console

Open the RabbitMQ web console in a browser using: http://localhost:15672 and following page should be displayed:

rabbitmq web console login

Enter following default credentials: Username="guest" and Password="guest" and click on Login. The overview page will be displayed that shows some basic information on the RabbitMQ server:

rabbitmq web console


This concludes setting up and configuring RabbitMQ. If you found this post helpful or have any questions or remarks, please leave a comment.

Saturday, June 28, 2014

Maven - Install Apache Maven on Windows

maven logo
Maven is a build automation tool used primarily for Java projects. Maven addresses two aspects of building software: First, it describes how software is built, and second, it describes its dependencies. Maven uses conventions for the build procedure, and only exceptions need to be written down. Maven is built using a plugin-based architecture that allows it to make use of any application controllable through standard input. The following tutorial will show you how to setup and configure Maven on your computer.


The tutorial assumes a Java runtime environment (JRE) has been installed and configured on your computer. If not please check the following post on how to install and configure a JRE.

Maven Install

Start by going to the Maven download page and locate the current stable version of Maven section. Download the binary ZIP file, at the time of writing it was 'apache-maven-3.2.2-bin.zip'. In this tutorial we will install on Windows.

maven download page

Extract the binaries archive downloaded in the previous step. The extracted root directory should contain a number of files and subdirectories as shown below. From now on we will refer to this directory as: [maven_install_dir].

maven install directory

Maven Configuration

Next we need to setup a 'M2_HOME' environment variable that will point to the installed Maven runtime. In addition if we want to run Maven from a command prompt we need to setup the 'PATH' environment variable to contain the Maven bin directory.

When using Windows the above parameters can be configured on the Environment Variables panel. Click on the Windows Start button and enter "env" without quotes as shown below.

edit environment variables for windows account

Environment variables can be set at account level or at system level. For this example click on Edit environment variables for your account and following panel should appear.

environment variables panel

Click on the New button and enter "M2_HOME" as variable name and the [maven_install_dir] as variable value. In this tutorial the installation directory is "C:\source4code\tools\apache-maven-3.2.2". Click OK to to save.
Note that "M2_HOME" is used for Maven 2 and later. "MAVEN_HOME" is for Maven 1.
add m2_home user variable

Select the 'PATH' entry and click on the Edit button. Add ";%M2_HOME%\bin" at the end of the variable value and click OK to save.
Note that in case a 'PATH' variable does not exist you can create it and use "%M2_HOME%\bin" as the variable value.
edit path variable value

The result should be as shown below. Click OK to close the Environment Variables panel.

environment variables panel maven configuration

In order to test the above configuration, open a command prompt by clicking on the Windows Start button and typing "cmd" followed by pressing ENTER. A new command prompt should open in which the following command can be entered to verify the installed Maven version:
mvn -version

The result should be as shown below.

maven version command

Maven Usage

Let's finish the tutorial by creating a basic Maven HelloWorld project. Open a command prompt and navigate to the directory in which you want to create the project. In the example below we will use 'C:\source4code\code'. Next enter following Maven command and press ENTER.
mvn archetype:generate -DgroupId=info.source4code -DartifactId=hello-world -DarchetypeArtifactId=maven-archetype-quickstart -DinteractiveMode=false

Maven will start looking for the needed dependencies in order to create the project which is based on the 'maven-archetype-quickstart' archetype (= a Maven project templating toolkit). If needed, dependencies are downloaded to the local repository. Once all dependencies are resolved, the project is created and a 'BUILD SUCCESS' statement is shown. Feel free to browse the created 'hello-world' directory. At the root you should be able to find the 'pom.xml', which is the XML representation of the Maven project.

maven archetype example


This concludes the setting up and configuring Maven. If you found this post helpful or have any questions or remarks, please leave a comment.

Java - Install a Java Development Kit (JDK) on Windows

java logo
Java is a computer programming language that is concurrent, class-based and object-oriented. It was originally developed by James Gosling at Sun Microsystems. Java applications are typically compiled to bytecode (class file) that can run on any Java virtual machine (JVM) regardless of computer architecture. Java is currently owned by the Oracle Corporation which acquired Sun Microsystems in 2010. Following tutorial will show you how to setup and configure Java on your computer so you can develop and run Java code.

JDK Install

Java can be downloaded from the Oracle Java download page. There are a number of different download packages available, for this tutorial we will be installing Java Standard Edition (SE) on Windows. In order to be able to compile Java code we need the Java Development Kit (JDK) package that comes with a Java compiler. The JDK package also comes with a Java runtime environment (JRE) that is needed to run compiled Java code.

For this tutorial we will use an older Java version which can be obtained by scrolling all the way down to the bottom of the page and clicking on the Previous Releases - Java Archive link. Look for the Java SE 6 link and after clicking on it select Java SE Development Kit 6u45. Accept the License Agreement and pick the correct download for your operating system. In this example we will use the Windows x64 version.

jdk download page

Sign in using your Oracle account (or create a new one) and the download should start. Once the download is complete, locate the 'jdk-6u45-windows-x64.exe' file and double click to run the installer.

jdk installer welcome

Click Next and on the following screen optionally change the installation location by clicking on the Change... button. In the example below the install location was change to 'C:\Java\jdk1.6.0_45'. From now on we will refer to this directory as: [java_install_dir].

jdk installer installation path

Click Next and then Close after the installer successfully finished installing Java.

jdk installer complete

JDK Configuration

In order for Java applications to be able to run we need to setup a JAVA_HOME environment variable that will point to the Java installation directory. In addition if we want to run Java commands from a command prompt we need to setup the PATH environment variable to contain the Java bin directory.

When using Windows the above parameters can be configured on the Environment Variables panel. Click on the Windows Start button and enter "env" without quotes as shown below.

edit environment variables for your account

Environment variables can be set at account level or at system level. For this example click on Edit environment variables for your account and following panel should appear.

environment variables panel

Click on the New button and enter "JAVA_HOME" as variable name and the [java_install_dir] as variable value. In this tutorial the installation directory is "C:\Java\jdk1.6.0_45". Click OK to to save.

java_home user variable

Click on the New button and enter "PATH" as variable name and "%JAVA_HOME%\bin" as variable value. Click OK to save.
Note that in case a PATH variable is already present you can add ";%JAVA_HOME%\bin" at the end of the variable value.
edit path variable value

The result should be as shown below. Click OK to close the environment variables panel.

environment variables panel jdk configuration

In order to test the above configuration, open a command prompt by clicking on the Windows Start button and typing "cmd" followed by pressing ENTER. A new command prompt should open in which the following command can be entered to verify the installed Java version:

java -version
The result should be as shown below.

jdk version command


This concludes the setting up and configuring Java. If you found this post helpful or have any questions or remarks, please leave a comment.
Sunday, April 27, 2014

Git - Upload source code to GitHub using Git GUI

git logo
GitHub is a web-based hosting service for software development projects that use the Git revision control system. It is used to share code with other people and a GitHub account is free for open source projects. Following tutorial will show you how to setup and configure Git on your computer so you can upload code towards GitHub.

Git GUI Install

First let's start by going to the Git downloads page and download the Git installer for your operating system. In this tutorial we will use Windows.

git download page

Double click to run the downloaded '.exe' file and click Next keeping the default settings on the different installer steps. At the end click Finish and Git should be successfully installed.

git installer

Start the Git command processor by clicking on the Git Bash link inside the Git program group (Start>All Programs>Git). A bash window should appear as shown below.

git bash console

1) Configure Git

First thing that needs to be done is to setup some basic Git parameters like user name and email address. In order to do so enter following commands and replace the value between the quotes with your own values.
git config --global user.name "<user_name>"
git config --global user.email "<user_email>"
Shown below is the execution of the two commands.

configure git using git bash

In order to verify if the values are set correctly enter following command:
git config --list
The result is a list of configuration parameters as shown below.

verify git setup using git bash

2) Generating SSH keys

It is strongly recommend to use an SSH connection when interacting with GitHub. SSH keys are a way to identify trusted computers, without involving passwords. To generate a new SSH key pair, copy and paste the command below, making sure to substitute the email value between the quotes with your own.
ssh-keygen -t rsa -C "<user_email>"
When asked to 'Enter file in which to save the key' just press ENTER to continue. Then a passphrase is requested which acts as a password you need to enter each time you want to use your key with SSH. Enter your password twice and the result should be as shown below.

generate ssh keys using git bash

Locate the generated keys by going to the location as shown in the console output. In the above example the location is: 'C:\Users\source4code\.ssh'

ssh keys location

The 'id_rsa' file contains your private key and the 'id_rsa.pub' file contains your public key.

3) Configure GitHub

Create an account at GitHub and sign in. Add a new remote repository by clicking the + New repository button. Enter a repository name and check the Initialize this repository with a README checkbox so a 'README.md' is automatically added as shown below.

github create repository

Next step is to add the public SSH key to your GitHub account. To do so access the GitHub account settings by clicking on the wrench/screwdriver icon in the top right hand corner. Then on the left hand side menu click on the SSH keys link.

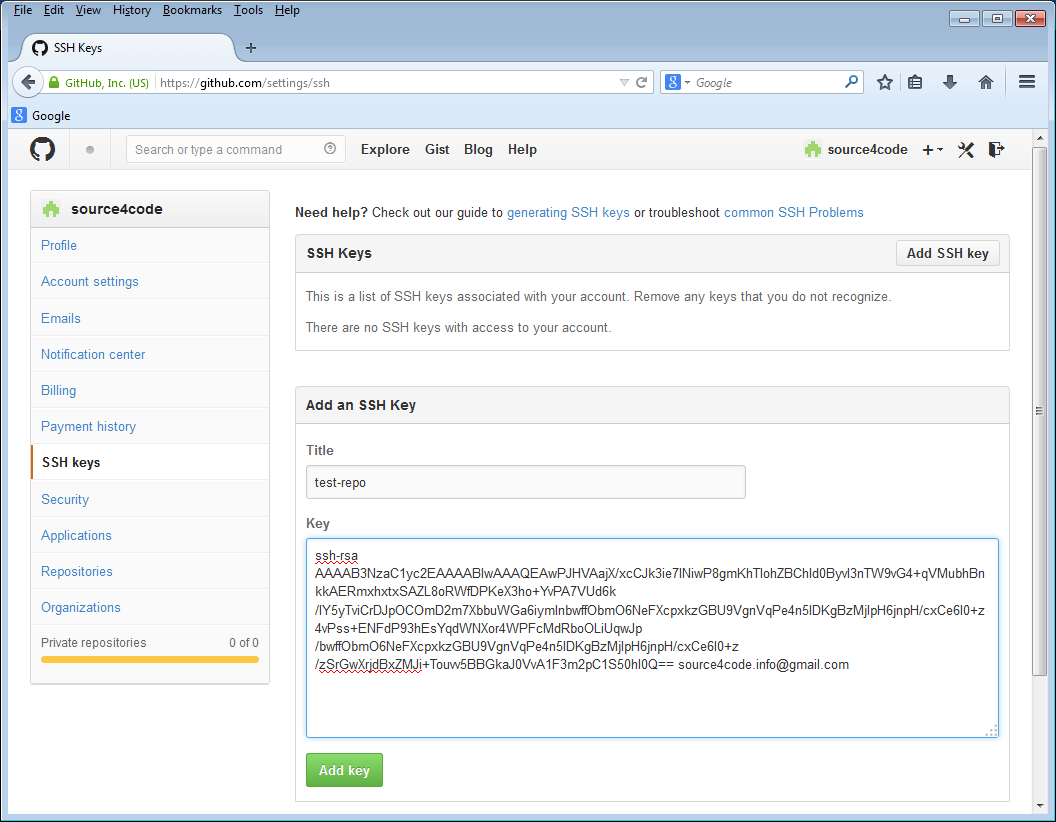
Click on the Add SSH key button in the top right hand corner. In the 'Title' text field enter a name for the public key that we will add (in the example below the name "test-repo" is used). Then open the 'id_rsa.pub' file that was generated in the previous section and copy paste the contents in the 'Key' text field as shown below. Save the SSH key by clicking the Add key button.

github add ssh key

The newly added key is part of the SSH keys that are associated with your account as shown below.
Note that the key fingerprint shown should be the same as the one that was printed during SSH keys creation in the previous section: 41:d7:ed:23:51:e0:ac:54:b4:52:6a:cf:b4:52:02
github ssh key fingerprint

4) Configure Git GUI

Start Git GUI by clicking on the Git GUI link inside the Git program group. Following window should appear.

git gui startup window

First thing to do is to create a new local Git repository. Click on the Create New Repository link and select a folder in which you would like to create a new local repository. In the example below the local repository is created at 'C:/source4code/code/test-repo'. Click the Create button to complete the repository creation.

git gui create new repository

A new window will open which shows the newly created Git repository.

git gui manage repository window

Next step is to add the remote Git repository at GitHub. Click on the Remote menu and select Add. A new window will pop-up in which a name for the remote repository and the location need to be added. In this example we will enter "test-repo" as name and "git@github.com:source4code/test-repo.git" as location as shown below.

git gui add new remote
The location for the remote GitHub repository can be found by logging into GitHub, selecting the repository to be added and then clicking on the SSH link at the bottom right-hand side of the screen.
github repository link

If the Fetch Immediately action in the popup window was left selected, the first thing Git GUI will do is fetch the content of the remote GitHub repository. Enter the passphrase of the SSH keys generated in the previous section and press OK. The result should be a success status as shown below. Click the Close button to finish.

git gui fetch repository

Git GUI Usage

Now that the remote repository was fetched we need to merge it with the local repository. Before this can be done, a local baseline is needed to merge with. Open the local repository location, in this example it was 'C:/source4code/code/test-repo' and add a file 'test1.txt'.

add file to git repository

Switch back to Git GUI and press the Rescan button. The added file should now appear under the 'Unstaged Changes' section. Then click on the Stage Changed button to tag the added file to be part of the files on which we will create a baseline and click Yes to confirm the untracked file. The file should now appear in the 'Staged Changes' section as shown below.

git gui staged changes
You can move files between the 'Unstaged Changes' and 'Staged Changes' section by using the Commit menu.
Add an initial commit message in the corresponding text box as shown below.

git gui commit message

Press the Commit button. The file will disappear from the 'Staged Changes' section and at the bottom of the screen a 'Created commit' message should appear.

git gui commit

Now the local and remote baseline need to be merged. Click on the Merge menu and select Local Merge. A new window will pop-up that shows the possible baselines that can be merged with the local master baseline.
If the remote 'test-repo/master' does not show as below, restart Git GUI!
git gui merge into master

Click on the Merge button and a success status should be appear which shows that the 'README.md' from the remote repository was successfully added.

git gui merge successful

The last thing left to do is to push the merged local baseline to GitHub. In order to do so select the Remote menu and click on the Push menu item. A new window is shown which shows the local master that will be pushed to the remote 'test-repo'.

git gui push branches

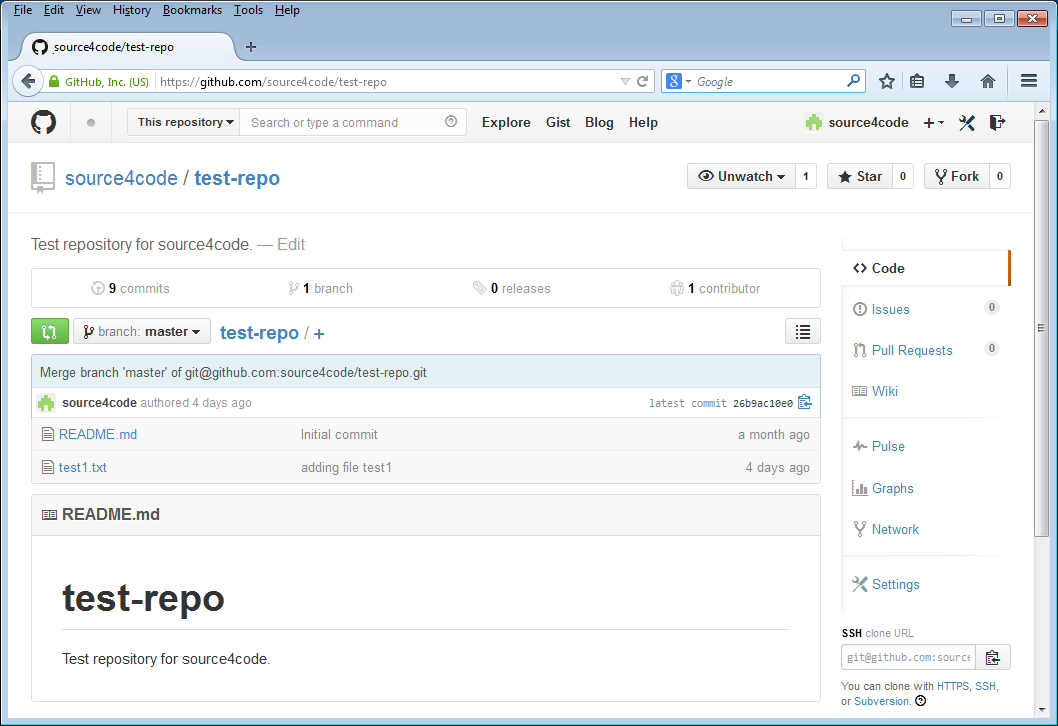
Click the Push button and enter the passphrase of the SSH keys. A success message should be shown. Close the message by clicking on the Close button and open your GitHub account. Select your repository and the 'test1.txt' file should be present as shown below.

github repository files

From now on you can add/change files on your local repository that can then be pushed to GitHub once committed.


This concludes setting up Git GUI so files can be uploaded to GitHub. If you found this post helpful or have any questions or remarks, please leave a comment.