Sunday, April 27, 2014

Git - Upload source code to GitHub using Git GUI

git logo
GitHub is a web-based hosting service for software development projects that use the Git revision control system. It is used to share code with other people and a GitHub account is free for open source projects. Following tutorial will show you how to setup and configure Git on your computer so you can upload code towards GitHub.

Git GUI Install

First let's start by going to the Git downloads page and download the Git installer for your operating system. In this tutorial we will use Windows.

git download page

Double click to run the downloaded '.exe' file and click Next keeping the default settings on the different installer steps. At the end click Finish and Git should be successfully installed.

git installer

Start the Git command processor by clicking on the Git Bash link inside the Git program group (Start>All Programs>Git). A bash window should appear as shown below.

git bash console

1) Configure Git

First thing that needs to be done is to setup some basic Git parameters like user name and email address. In order to do so enter following commands and replace the value between the quotes with your own values.
git config --global user.name "<user_name>"
git config --global user.email "<user_email>"
Shown below is the execution of the two commands.

configure git using git bash

In order to verify if the values are set correctly enter following command:
git config --list
The result is a list of configuration parameters as shown below.

verify git setup using git bash

2) Generating SSH keys

It is strongly recommend to use an SSH connection when interacting with GitHub. SSH keys are a way to identify trusted computers, without involving passwords. To generate a new SSH key pair, copy and paste the command below, making sure to substitute the email value between the quotes with your own.
ssh-keygen -t rsa -C "<user_email>"
When asked to 'Enter file in which to save the key' just press ENTER to continue. Then a passphrase is requested which acts as a password you need to enter each time you want to use your key with SSH. Enter your password twice and the result should be as shown below.

generate ssh keys using git bash

Locate the generated keys by going to the location as shown in the console output. In the above example the location is: 'C:\Users\source4code\.ssh'

ssh keys location

The 'id_rsa' file contains your private key and the 'id_rsa.pub' file contains your public key.

3) Configure GitHub

Create an account at GitHub and sign in. Add a new remote repository by clicking the + New repository button. Enter a repository name and check the Initialize this repository with a README checkbox so a 'README.md' is automatically added as shown below.

github create repository

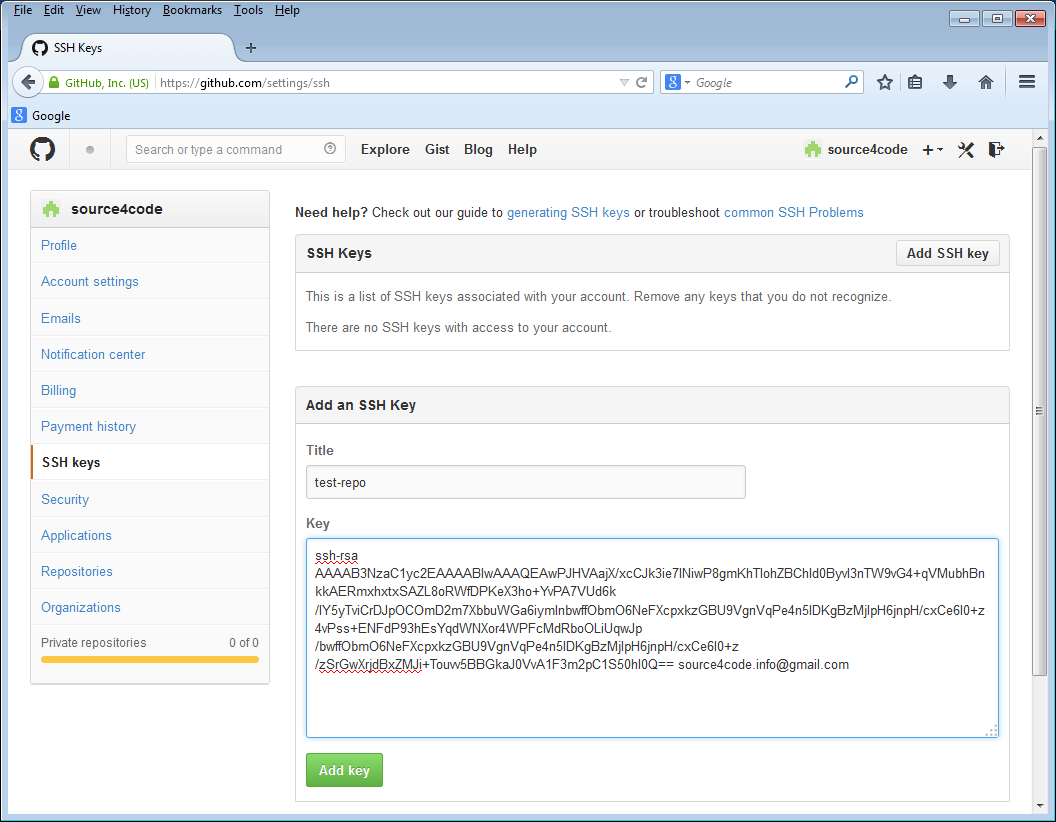
Next step is to add the public SSH key to your GitHub account. To do so access the GitHub account settings by clicking on the wrench/screwdriver icon in the top right hand corner. Then on the left hand side menu click on the SSH keys link.

Click on the Add SSH key button in the top right hand corner. In the 'Title' text field enter a name for the public key that we will add (in the example below the name "test-repo" is used). Then open the 'id_rsa.pub' file that was generated in the previous section and copy paste the contents in the 'Key' text field as shown below. Save the SSH key by clicking the Add key button.

github add ssh key

The newly added key is part of the SSH keys that are associated with your account as shown below.
Note that the key fingerprint shown should be the same as the one that was printed during SSH keys creation in the previous section: 41:d7:ed:23:51:e0:ac:54:b4:52:6a:cf:b4:52:02
github ssh key fingerprint

4) Configure Git GUI

Start Git GUI by clicking on the Git GUI link inside the Git program group. Following window should appear.

git gui startup window

First thing to do is to create a new local Git repository. Click on the Create New Repository link and select a folder in which you would like to create a new local repository. In the example below the local repository is created at 'C:/source4code/code/test-repo'. Click the Create button to complete the repository creation.

git gui create new repository

A new window will open which shows the newly created Git repository.

git gui manage repository window

Next step is to add the remote Git repository at GitHub. Click on the Remote menu and select Add. A new window will pop-up in which a name for the remote repository and the location need to be added. In this example we will enter "test-repo" as name and "git@github.com:source4code/test-repo.git" as location as shown below.

git gui add new remote
The location for the remote GitHub repository can be found by logging into GitHub, selecting the repository to be added and then clicking on the SSH link at the bottom right-hand side of the screen.
github repository link

If the Fetch Immediately action in the popup window was left selected, the first thing Git GUI will do is fetch the content of the remote GitHub repository. Enter the passphrase of the SSH keys generated in the previous section and press OK. The result should be a success status as shown below. Click the Close button to finish.

git gui fetch repository

Git GUI Usage

Now that the remote repository was fetched we need to merge it with the local repository. Before this can be done, a local baseline is needed to merge with. Open the local repository location, in this example it was 'C:/source4code/code/test-repo' and add a file 'test1.txt'.

add file to git repository

Switch back to Git GUI and press the Rescan button. The added file should now appear under the 'Unstaged Changes' section. Then click on the Stage Changed button to tag the added file to be part of the files on which we will create a baseline and click Yes to confirm the untracked file. The file should now appear in the 'Staged Changes' section as shown below.

git gui staged changes
You can move files between the 'Unstaged Changes' and 'Staged Changes' section by using the Commit menu.
Add an initial commit message in the corresponding text box as shown below.

git gui commit message

Press the Commit button. The file will disappear from the 'Staged Changes' section and at the bottom of the screen a 'Created commit' message should appear.

git gui commit

Now the local and remote baseline need to be merged. Click on the Merge menu and select Local Merge. A new window will pop-up that shows the possible baselines that can be merged with the local master baseline.
If the remote 'test-repo/master' does not show as below, restart Git GUI!
git gui merge into master

Click on the Merge button and a success status should be appear which shows that the 'README.md' from the remote repository was successfully added.

git gui merge successful

The last thing left to do is to push the merged local baseline to GitHub. In order to do so select the Remote menu and click on the Push menu item. A new window is shown which shows the local master that will be pushed to the remote 'test-repo'.

git gui push branches

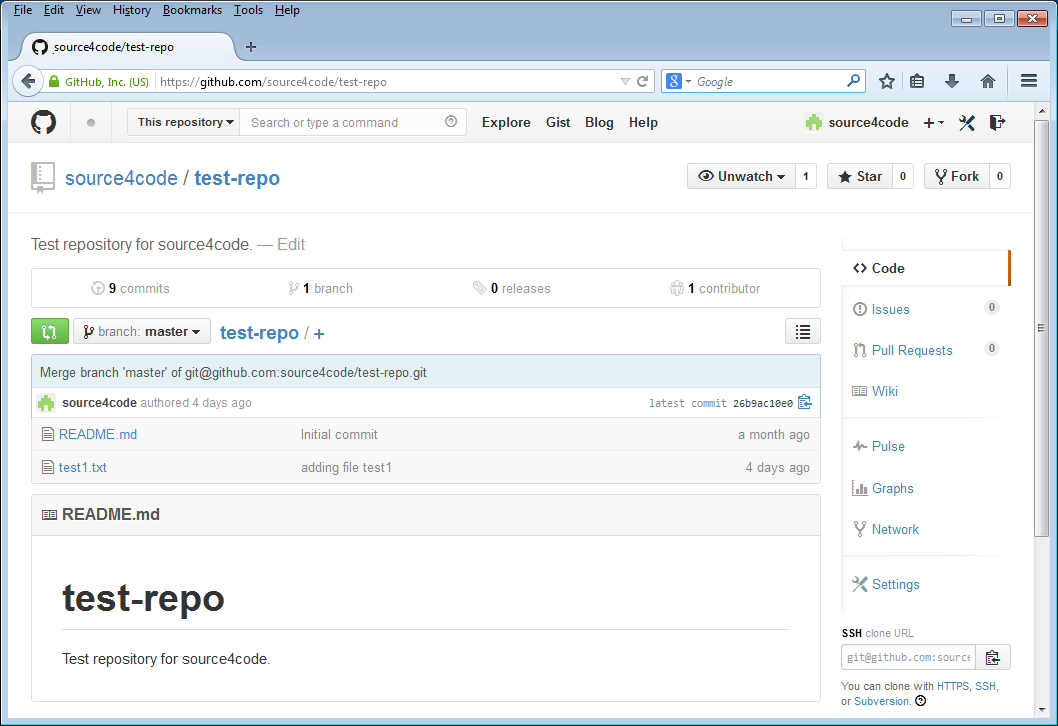
Click the Push button and enter the passphrase of the SSH keys. A success message should be shown. Close the message by clicking on the Close button and open your GitHub account. Select your repository and the 'test1.txt' file should be present as shown below.

github repository files

From now on you can add/change files on your local repository that can then be pushed to GitHub once committed.


This concludes setting up Git GUI so files can be uploaded to GitHub. If you found this post helpful or have any questions or remarks, please leave a comment.

Saturday, April 26, 2014

Blogger - Setup SyntaxHighlighter

syntaxhighlighter logo
Blogger, the blog-publishing service from Google, does not provide a syntax highlighter out of the box. This means you need to resort to third party solutions in order to have syntax highlighting in your posts. One of those solutions is the awesome syntax highlighter created by Alex Gorbatchev which is called SyntaxHighlighter. The big advantage of this highlighter is that it is purely written in JavaScript and as a result it does not need a server side component and can be easily integrated into blogger. Following tutorial will detail how to setup and use SyntaxHighlighter on your Blogger blog.

SyntaxHighlighter Install

First thing to do is to open the dashboard of your Blogger blog as shown below. On the left hand side find the menu that says Template and click on it.

blogger template

This will open the template page of your blog. Click on the button that says Edit HTML in order to open up the HTML editor as shown below.

blogger edit html

Click anywhere inside the editor window and press CTRL+F. A search box should now appear in the upper right hand corner as shown below. In the search box enter "</head>" (without quotes) and press ENTER.
 
blogger edit html search

The editor window will now jump the end of the HTML header tag where we will add the needed style sheets and JavaScript files. The SyntaxHighlighter configuration consists out of four parts:
  1. The core files
  2. The SyntaxHighlighter theme
  3. The specific brush(es) needed for the blog
  4. The configuration script

1) The core files

The core files consist out of the following JavaScript file and style sheet:
<script src="http://alexgorbatchev.com/pub/sh/current/scripts/shCore.js" type="text/javascript"></script>
<link href="http://alexgorbatchev.com/pub/sh/current/styles/shCore.css" rel="stylesheet" type="text/css"></link>

2) The SyntaxHighlighter theme

There are a number of themes available for SyntaxHighlighter, for the complete list please check following link. The style sheet below is the default theme.
<link href="http://alexgorbatchev.com/pub/sh/current/styles/shThemeDefault.css" rel="stylesheet" type="text/css" />

3) The specific brush(es) needed for the blog

Depending on the structured language that needs to be highlighted, the corresponding brush needs to be imported. For a complete list of all available brushes please check following link. In this example we will add the brushes for 'Java' and 'XML'.
<script src="http://alexgorbatchev.com/pub/sh/current/scripts/shBrushJava.js" type="text/javascript"></scrip>
<script src="http://alexgorbatchev.com/pub/sh/current/scripts/shBrushXml.js" type="text/javascript"></script>
Only add the needed brushes as for each page the brushes are retrieved from alexgorbatchev.com (the SyntaxHighlighter site) as this increases your blog page load times!

4) The configuration script

After all needed dependencies have been added we need to enable a specific mode for Blogger and instruct SyntaxHighlighter to highlight all code blocks found on the web page. This is done by adding a JavaScript snippet as shown below.
<script language="javascript" type="text/javascript">
SyntaxHighlighter.config.bloggerMode = true;
SyntaxHighlighter.all();
</script>


The complete script to be inserted in the Blogger template is shown below. Copy and paste right before the '</head>' tag as shown on the screenshot.
<!-- 'SyntaxHighlighter' additions START -->
<script src="http://alexgorbatchev.com/pub/sh/current/scripts/shCore.js" type="text/javascript"></script>
<link href="http://alexgorbatchev.com/pub/sh/current/styles/shCore.css" rel="stylesheet" type="text/css" />
<link href="http://alexgorbatchev.com/pub/sh/current/styles/shThemeDefault.css" rel="stylesheet" type="text/css" />
<script src="http://alexgorbatchev.com/pub/sh/current/scripts/shBrushJava.js" type="text/javascript"></script>
<script src="http://alexgorbatchev.com/pub/sh/current/scripts/shBrushXml.js" type="text/javascript"></script>

<script language="javascript" type="text/javascript">
SyntaxHighlighter.config.bloggerMode = true;
SyntaxHighlighter.all();
</script>
<!-- 'SyntaxHighlighter' additions END -->

blogger save template

Click the Save template button to save the changes made to your Blogger template. This concludes the setup, in the next section will see how to use SyntaxHighlighter.

SyntaxHighlighter Usage

In order to use SyntaxHighlighter we need to wrap the section to be highlighted with an XML tag called <pre>. This tag has one required parameter called 'brush' which is the same brush that was added in section 3 of the above setup.

For this example we will add a HelloWorld Java class to a <pre> tag with a 'Java' brush and a Hello World XML file to a <pre> tag with a 'XML' brush. Copy the below code and paste it inside a Blogger post as shown.
Make sure all right angle brackets within the <pre> tags are HTML escaped, in other words all "<" (less than character) must be replaced with "&lt;" (without quotes, as highlighted below)!
<pre class="brush: java">
public class HelloWorld {

public static void main(String[] args) {
System.out.println("Hello World!");
}
}
</pre>

<pre class="brush: xml">
&lt;?xml version="1.0" encoding="UTF-8" ?>
&lt;text>Hello World!&lt;/text>
</pre>

blogger syntaxhighlighter syntax

Save and publish the page and the result should look like:
syntaxhighlighter example

SyntaxHighlighter Options

In addition to the mandatory 'brush' parameter, the <pre> tag has a number of optional parameters. For example it is possible to highlight one or more lines to focus the reader's attention by adding the 'highlight' parameter as shown below. The full list of available parameters can be found here.
<pre class="brush: java; highlight: [3,4,5]">
public class HelloWorld {

public static void main(String[] args) {
System.out.println("Hello World!");
}
}
</pre>

The result of above snippet:
syntaxhighlighter highlight example


This concludes setting up SyntaxHighlighter on Blogger. If you found this post helpful or have any questions or remarks, please leave a comment.

Saturday, April 12, 2014

JSF - PrimeFaces Hello World using Jetty and Maven

PrimeFaces is an open source component library for JavaServer Faces (JSF). It provides a collection of mostly visual components (widgets) that can be used by JSF programmers to build the UI for a web application. An overview of these widgets can be found at the PrimeFaces showcase. The following post illustrates a basic example in which we will configure, build and run a Hello World PrimeFaces example using Jetty and Maven.


Tools used:
  • JSF 2.2
  • PrimeFaces 5.1
  • Jetty 8
  • Maven 3

First let's look at the below Maven POM file which contains the needed dependencies for our project. At the bottom of the dependencies list we find the PrimeFaces library. As PrimeFaces is built on top of 'JavaServer Faces' we also need to include the JSF dependencies. JSF is a component based Model–view–controller (MVC) framework which is built on top of the 'Servlet API' so we also need to include the Servlet dependency.

In order to run our example we need a servlet container (the component of a web server that interacts with Java servlets). There are a number of servlet containers implmenetations available, in the below example we will use Jetty which is a non-commercial pure Java-based HTTP (Web) server and Java Servlet container from the Eclipse Foundation. There is a Jetty Maven plugin which allows launching a Jetty instance from command line using Maven which has been configured so that the HTTP listener port is set to '9090' and the context path is set to 's4c'.
<?xml version="1.0" encoding="UTF-8"?>
<project xmlns="http://maven.apache.org/POM/4.0.0" xmlns:xsi="http://www.w3.org/2001/XMLSchema-instance"
xsi:schemaLocation="http://maven.apache.org/POM/4.0.0 http://maven.apache.org/xsd/maven-4.0.0.xsd">
<modelVersion>4.0.0</modelVersion>

<groupId>info.source4code</groupId>
<artifactId>jsf-jetty-primefaces-helloworld</artifactId>
<version>1.0</version>
<packaging>war</packaging>

<name>JSF - PrimeFaces Hello World using Jetty and Maven</name>
<url>http://www.source4code.info/2014/04/jsf-primefaces-hello-world-jetty-maven.html</url>

<properties>
<project.build.sourceEncoding>UTF-8</project.build.sourceEncoding>
<java.version>1.6</java.version>

<junit.version>4.12-beta-2</junit.version>
<servlet.version>3.0.1</servlet.version>
<jsf.version>2.2.8-02</jsf.version>
<primefaces.version>5.1</primefaces.version>

<maven-compiler-plugin.version>3.1</maven-compiler-plugin.version>
<jetty-maven-plugin.version>8.1.14.v20131031</jetty-maven-plugin.version>
</properties>

<dependencies>
<!-- JUnit -->
<dependency>
<groupId>junit</groupId>
<artifactId>junit</artifactId>
<version>${junit.version}</version>
<scope>test</scope>
</dependency>
<!-- Servlet -->
<dependency>
<groupId>javax.servlet</groupId>
<artifactId>javax.servlet-api</artifactId>
<version>${servlet.version}</version>
</dependency>
<!-- JSF -->
<dependency>
<groupId>com.sun.faces</groupId>
<artifactId>jsf-api</artifactId>
<version>${jsf.version}</version>
</dependency>
<dependency>
<groupId>com.sun.faces</groupId>
<artifactId>jsf-impl</artifactId>
<version>${jsf.version}</version>
</dependency>
<!-- PrimeFaces -->
<dependency>
<groupId>org.primefaces</groupId>
<artifactId>primefaces</artifactId>
<version>${primefaces.version}</version>
</dependency>
</dependencies>

<build>
<plugins>
<plugin>
<groupId>org.apache.maven.plugins</groupId>
<artifactId>maven-compiler-plugin</artifactId>
<version>${maven-compiler-plugin.version}</version>
<configuration>
<source>${java.version}</source>
<target>${java.version}</target>
</configuration>
</plugin>
<plugin>
<groupId>org.mortbay.jetty</groupId>
<artifactId>jetty-maven-plugin</artifactId>
<version>${jetty-maven-plugin.version}</version>
<configuration>
<webAppConfig>
<contextPath>/s4c</contextPath>
</webAppConfig>
<connectors>
<connector
implementation="org.eclipse.jetty.server.nio.SelectChannelConnector">
<port>9090</port>
</connector>
</connectors>
</configuration>
</plugin>
</plugins>
</build>
</project>

Next is the HelloWorld class which is a simple POJO (Plain Old Java Object) that will provide data for the PrimeFaces (JSF) components. It contains the getters and setters for first and last name fields as well as a method to show a greeting.

In JSF, a class that can be accessed from a JSF page is called Managed Bean. By annotating the HelloWorld class with the @ManagedBean annotation it becomes a Managed Bean which is accessible and controlled by the JSF framework.
package info.source4code.jsf.primefaces;

import javax.faces.bean.ManagedBean;

@ManagedBean
public class HelloWorld {

private String firstName = "John";
private String lastName = "Doe";

public String getFirstName() {
return firstName;
}

public void setFirstName(String firstName) {
this.firstName = firstName;
}

public String getLastName() {
return lastName;
}

public void setLastName(String lastName) {
this.lastName = lastName;
}

public String showGreeting() {
return "Hello" + " " + firstName + " " + lastName + "!";
}
}

The web page that will be shown is a standard JSF page as defined below. It contains a number of PrimeFaces components which include two <p:inputText> fields, that will be used to enter a first and last name, surrounded by a <p:panel>. There is also a <p:dialog> component that shows a greeting message. The dialog is triggered by a <p:commandButton> that is part of the panel.

In order to use the PrimeFaces components, following namespace needs to be declared: xmlns:p="http://primefaces.org/ui
<?xml version="1.0" encoding="UTF-8"?>
<!DOCTYPE html PUBLIC "-//W3C//DTD XHTML 1.0 Transitional//EN" "http://www.w3.org/TR/xhtml1/DTD/xhtml1-transitional.dtd">
<html xmlns="http://www.w3.org/1999/xhtml" xmlns:h="http://java.sun.com/jsf/html"
xmlns:f="http://java.sun.com/jsf/core" xmlns:ui="http://java.sun.com/jsf/facelets"
xmlns:p="http://primefaces.org/ui">

<h:head>
<title>Hello World</title>
</h:head>

<h:body>
<h:form>

<p:panel header="Hello World">
<h:panelGrid columns="2" cellpadding="4">
<h:outputText value="First Name: " />
<p:inputText value="#{helloWorld.firstName}" />

<h:outputText value="Last Name: " />
<p:inputText value="#{helloWorld.lastName}" />

<p:commandButton value="Submit"
update="display" oncomplete="PF('dlg').show()" />

</h:panelGrid>
</p:panel>

<p:dialog header="Greeting" widgetVar="dlg" modal="true"
resizable="false">
<h:panelGrid id="display" columns="1"
cellpadding="4">
<h:outputText value="#{helloWorld.showGreeting()}" />

</h:panelGrid>
</p:dialog>

</h:form>
</h:body>
</html>

Java web applications use a deployment descriptor file to determine how URLs map to servlets and other information. This file is named 'web.xml', and resides in the application's WAR under the 'WEB-INF' directory. The below 'web.xml' contains the definition of the FacesServlet servlet class that will be used to manage the request processing lifecycle of our web page which contains JSF components. The page is mapped to the servlet by defining a mapping for all files ending with '.xhtml'.
Note that MyFaces and Mojarra register a servlet context listener for the startup configuration via the TLD file of the JSF core taglib. Jetty 8 uses the Glassfish JSP implementation which requires the TLD files to be on the classpath of the container which is not the case if the application is started via the Jetty Maven Plugin. In order to fix this the easiest solution is to simply add the config listener to the web.xml. For more information check this blog post.
<?xml version="1.0" encoding="UTF-8"?>
<web-app xmlns:xsi="http://www.w3.org/2001/XMLSchema-instance"
xmlns="http://java.sun.com/xml/ns/javaee" xmlns:web="http://java.sun.com/xml/ns/javaee/web-app_3_0.xsd"
xsi:schemaLocation="http://java.sun.com/xml/ns/javaee http://java.sun.com/xml/ns/javaee/web-app_3_0.xsd"
version="3.0">

<display-name>PrimeFaces HelloWorld Example</display-name>

<!-- Define the JSF listener class when using the Jetty Maven Plugin
with Jetty8 -->
<listener>
<listener-class>com.sun.faces.config.ConfigureListener</listener-class>
</listener>

<!-- File(s) appended to a request for a URL that is not mapped to a
web component -->
<welcome-file-list>
<welcome-file>helloworld.xhtml</welcome-file>
</welcome-file-list>

<!-- Define the JSF servlet (manages the request processing lifecycle
forJavaServer) -->
<servlet>
<servlet-name>faces</servlet-name>
<servlet-class>javax.faces.webapp.FacesServlet</servlet-class>
<load-on-startup>1</load-on-startup>
</servlet>

<!-- Map following files to the JSF servlet -->
<servlet-mapping>
<servlet-name>faces</servlet-name>
<url-pattern>*.xhtml</url-pattern>
</servlet-mapping>
</web-app>

In order to run the above example open a command prompt and execute following Maven command:
mvn jetty:run

Maven will download the needed dependencies, compile the code and start a Jetty instance on which the web application will be deployed. The result should be the following Jetty startup trace ending with: 'Started Jetty Server'.
[INFO] --- jetty-maven-plugin:8.1.14.v20131031:run (default-cli) @ jsf-primefaces-helloworld ---
[INFO] Configuring Jetty for project: JSF - PrimeFaces HelloWorld example using Jetty
[INFO] webAppSourceDirectory not set. Defaulting to D:\source4code\code\jsf-primefaces-helloworld\src\main\webapp
[INFO] Reload Mechanic: automatic
[INFO] Classes = D:\source4code\code\jsf-primefaces-helloworld\target\classes
[INFO] Context path = /s4c
[INFO] Tmp directory = D:\source4code\code\jsf-primefaces-helloworld\target\tmp
[INFO] Web defaults = org/eclipse/jetty/webapp/webdefault.xml
[INFO] Web overrides = none
[INFO] web.xml file = file:/D:/source4code/code/jsf-primefaces-helloworld/src/main/webapp/WEB-INF/web.xml
[INFO] Webapp directory = D:\source4code\code\jsf-primefaces-helloworld\src\main\webapp
2014-07-05 13:52:33.306:INFO:oejs.Server:jetty-8.1.14.v20131031
2014-07-05 13:52:33.794:INFO:oejpw.PlusConfiguration:No Transaction manager found - if your webapp requires one, please configure one.
5-jul-2014 13:52:35 com.sun.faces.config.ConfigureListener contextInitialized
INFO: Initializing Mojarra 2.2.7 ( 20140610-1547 https://svn.java.net/svn/mojarra~svn/tags/2.2.7@13362) for context '/s4c'
5-jul-2014 13:52:35 com.sun.faces.spi.InjectionProviderFactory createInstance
INFO: JSF1048: PostConstruct/PreDestroy annotations present. ManagedBeans methods marked with these annotations will have said annotations processed.
5-jul-2014 13:52:36 org.primefaces.webapp.PostConstructApplicationEventListener processEvent
INFO: Running on PrimeFaces 5.0
2014-07-05 13:52:36.358:WARN:oejsh.RequestLogHandler:!RequestLog
2014-07-05 13:52:36.378:INFO:oejs.AbstractConnector:Started SelectChannelConnector@0.0.0.0:9090
[INFO] Started Jetty Server

Open a web browser and enter following URL: http://localhost:9090/s4c/. The result should be that below page is displayed:


Enter a first and last name and press the Submit button. A pop-up dialog will be shown with a greeting message.


github icon
If you would like to run the above code sample you can download the full source code and their corresponding JUnit test cases here.

This concludes the PrimeFaces Hello World example. If you found this post helpful or have any questions or remarks, please leave a comment.