Git GUI Install
First let's start by going to the Git downloads page and download the Git installer for your operating system. In this tutorial we will use Windows.
Double click to run the downloaded '.exe' file and click Next keeping the default settings on the different installer steps. At the end click Finish and Git should be successfully installed.

Start the Git command processor by clicking on the Git Bash link inside the Git program group (Start>All Programs>Git). A bash window should appear as shown below.

1) Configure Git
First thing that needs to be done is to setup some basic Git parameters like user name and email address. In order to do so enter following commands and replace the value between the quotes with your own values.git config --global user.name "<user_name>"Shown below is the execution of the two commands.
git config --global user.email "<user_email>"

In order to verify if the values are set correctly enter following command:
git config --listThe result is a list of configuration parameters as shown below.

2) Generating SSH keys
It is strongly recommend to use an SSH connection when interacting with GitHub. SSH keys are a way to identify trusted computers, without involving passwords. To generate a new SSH key pair, copy and paste the command below, making sure to substitute the email value between the quotes with your own.ssh-keygen -t rsa -C "<user_email>"When asked to 'Enter file in which to save the key' just press ENTER to continue. Then a passphrase is requested which acts as a password you need to enter each time you want to use your key with SSH. Enter your password twice and the result should be as shown below.

Locate the generated keys by going to the location as shown in the console output. In the above example the location is: 'C:\Users\source4code\.ssh'

The 'id_rsa' file contains your private key and the 'id_rsa.pub' file contains your public key.
3) Configure GitHub
Create an account at GitHub and sign in. Add a new remote repository by clicking the + New repository button. Enter a repository name and check the Initialize this repository with a README checkbox so a 'README.md' is automatically added as shown below.
Next step is to add the public SSH key to your GitHub account. To do so access the GitHub account settings by clicking on the wrench/screwdriver icon in the top right hand corner. Then on the left hand side menu click on the SSH keys link.
Click on the Add SSH key button in the top right hand corner. In the 'Title' text field enter a name for the public key that we will add (in the example below the name "test-repo" is used). Then open the 'id_rsa.pub' file that was generated in the previous section and copy paste the contents in the 'Key' text field as shown below. Save the SSH key by clicking the Add key button.
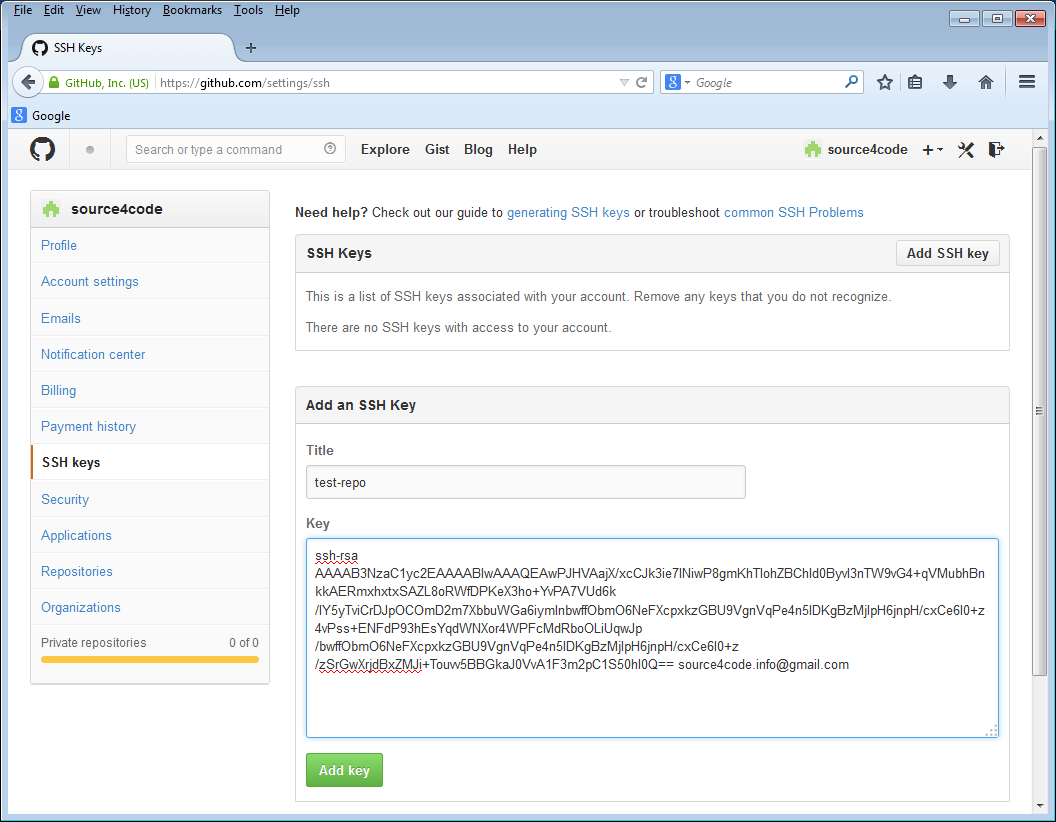
The newly added key is part of the SSH keys that are associated with your account as shown below.
Note that the key fingerprint shown should be the same as the one that was printed during SSH keys creation in the previous section: 41:d7:ed:23:51:e0:ac:54:b4:52:6a:cf:b4:52:02

4) Configure Git GUI
Start Git GUI by clicking on the Git GUI link inside the Git program group. Following window should appear.
First thing to do is to create a new local Git repository. Click on the Create New Repository link and select a folder in which you would like to create a new local repository. In the example below the local repository is created at 'C:/source4code/code/test-repo'. Click the Create button to complete the repository creation.

A new window will open which shows the newly created Git repository.

Next step is to add the remote Git repository at GitHub. Click on the Remote menu and select Add. A new window will pop-up in which a name for the remote repository and the location need to be added. In this example we will enter "test-repo" as name and "git@github.com:source4code/test-repo.git" as location as shown below.

The location for the remote GitHub repository can be found by logging into GitHub, selecting the repository to be added and then clicking on the SSH link at the bottom right-hand side of the screen.

If the Fetch Immediately action in the popup window was left selected, the first thing Git GUI will do is fetch the content of the remote GitHub repository. Enter the passphrase of the SSH keys generated in the previous section and press OK. The result should be a success status as shown below. Click the Close button to finish.

Git GUI Usage
Now that the remote repository was fetched we need to merge it with the local repository. Before this can be done, a local baseline is needed to merge with. Open the local repository location, in this example it was 'C:/source4code/code/test-repo' and add a file 'test1.txt'.
Switch back to Git GUI and press the Rescan button. The added file should now appear under the 'Unstaged Changes' section. Then click on the Stage Changed button to tag the added file to be part of the files on which we will create a baseline and click Yes to confirm the untracked file. The file should now appear in the 'Staged Changes' section as shown below.

You can move files between the 'Unstaged Changes' and 'Staged Changes' section by using the Commit menu.Add an initial commit message in the corresponding text box as shown below.

Press the Commit button. The file will disappear from the 'Staged Changes' section and at the bottom of the screen a 'Created commit' message should appear.

Now the local and remote baseline need to be merged. Click on the Merge menu and select Local Merge. A new window will pop-up that shows the possible baselines that can be merged with the local master baseline.
If the remote 'test-repo/master' does not show as below, restart Git GUI!

Click on the Merge button and a success status should be appear which shows that the 'README.md' from the remote repository was successfully added.

The last thing left to do is to push the merged local baseline to GitHub. In order to do so select the Remote menu and click on the Push menu item. A new window is shown which shows the local master that will be pushed to the remote 'test-repo'.

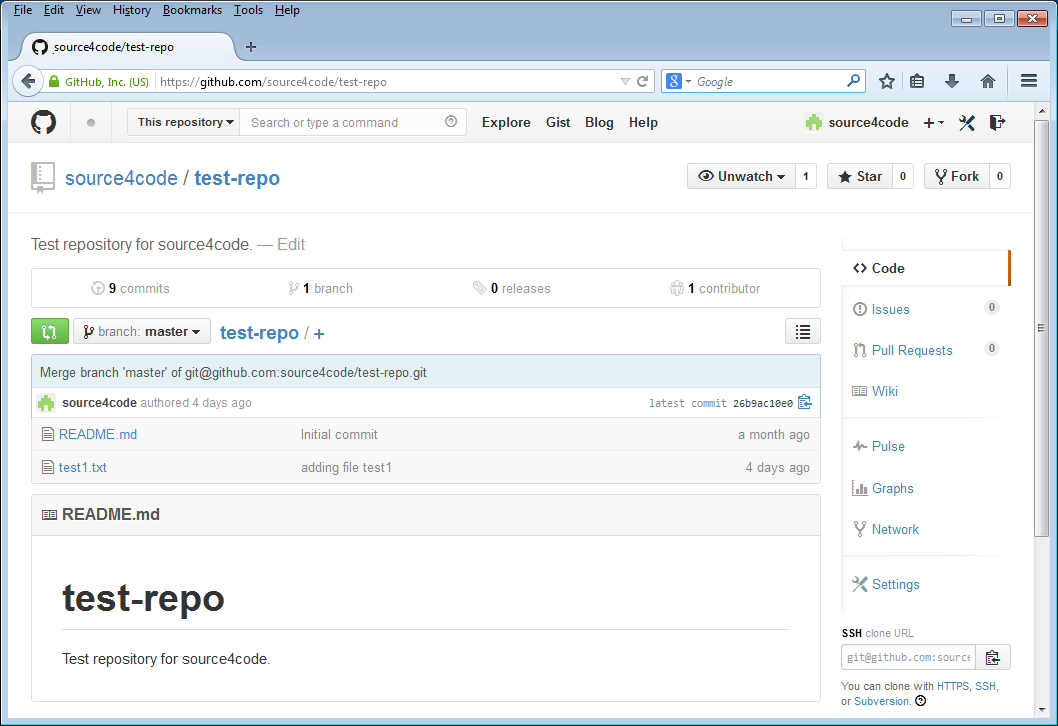
Click the Push button and enter the passphrase of the SSH keys. A success message should be shown. Close the message by clicking on the Close button and open your GitHub account. Select your repository and the 'test1.txt' file should be present as shown below.
From now on you can add/change files on your local repository that can then be pushed to GitHub once committed.
This concludes setting up Git GUI so files can be uploaded to GitHub. If you found this post helpful or have any questions or remarks, please leave a comment.
No comments:
Post a Comment